WebSocket API 문서화: AsyncAPI 커스텀 구현과 동적 스펙 생성 시스템
소켓 API 문서화를 위해 AsyncAPI를 도입했습니다. nest-asyncapi의 한계를 극복하기 위해 데코레이터 기반 메타데이터 수집과 동적 AsyncAPI 스펙 생성 시스템을 직접 구현한 과정을 공유합니다.
들어가며
소켓 명세를 노션에 손수 정리했지만, 꼭 빠뜨리는 항목이 생기곤 했습니다. 휴먼 이슈들이 계속 쌓이면서, 결국 협업에 있어 불편한 역효과로 돌아왔었습니다.
반면 REST API 영역은 OpenAPI(Swagger)를 도입한 덕분에 백엔드가 스펙을 기준으로 흐름을 잡을 수 있었고, 프런트도 놓치는 요소 없이 구현을 이어갈 수 있었습니다.
그래서 비동기 이벤트에 대해서도 문서화 진행이 필요하다는 생각이 들었고, asyncAPI가 비동기 진영에서 가장 널리 쓰이는 표준이기 때문에 도입을 검토해 보았습니다.
[
AsyncAPI Initiative for event-driven APIs Open source tools to easily build and maintain your event-driven architecture.
All powered by the AsyncAPI specification, the industry standard for defining asynchronous APIs.](https://asyncapi.com/en)
해당 기술을 NestJS에서 더 쉽게 사용하기 위해서 라이브러리를 탐색해보았습니다. 그 중에는 nest-asyncapi 라이브러리가 있었습니다.
[
GitHub - flamewow/nestjs-asyncapi: NestJS AsyncAPI module - generate documentation of your event-based services using decorators NestJS AsyncAPI module - generate documentation of your event-based services using decorators - flamewow/nestjs-asyncapi](https://github.com/flamewow/nestjs-asyncapi) 하지만 해당 라이브러리를 살펴본 결과, 저희가 운영 중인 소켓 구조와 맞지 않는 부분이 많았고 원하는 품질의 문서화를 기대하기 어렵다는 판단이 들었습니다.
결국 커스텀해서 만들어보자는 결론에 이르렀습니다. 모든 기능을 추상화하기 보다 일단 서비스에 맞게 가볍게 돌려 보면서 방향으로 진행하고자 합니다.
소켓 이용 패턴
1. 이벤트 타입별 기능 분리(기능당 이벤트)
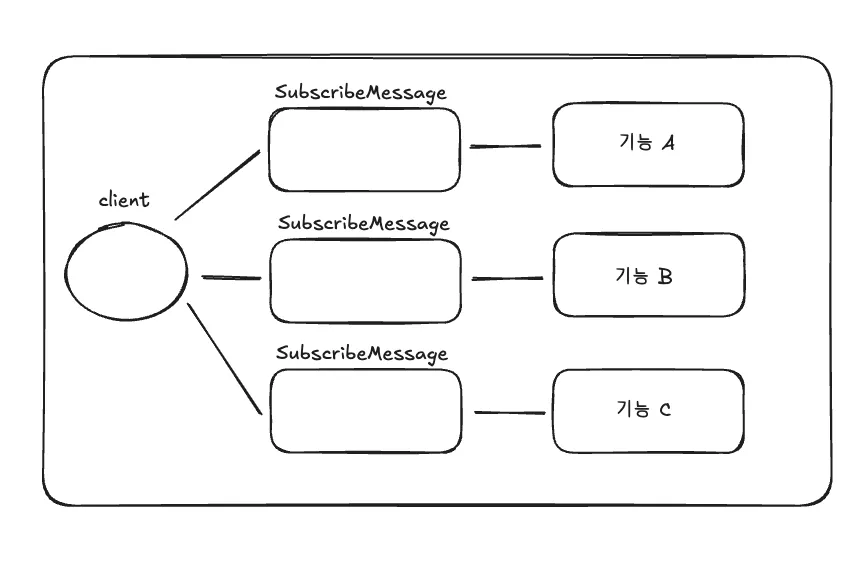
네임스페이스 하나에 이벤트별로 기능을 분리한 구조입니다.
예시로 아래와 같이 구성할 수 있습니다.
네임스페이스: 기능별 하나 (ex. chat)이벤트 이름: message:new, message:edited, typing:start 등 다수payload는 각 이벤트 메세지 전용 구조
장점과 단점은 아래와 같아요.
장점
- 이벤트 이름만 보고도 기능이 구분되고 로그/모니터링이 쉽다.
- 핸들러가 이벤트별로 쪼개지니 책임이 명확하다.
- 타입 검증을 이벤트별로 적용 가능하다.
단점
- 클라이언트에서 이벤트별 리스너 등록이 많아진다.
- 이벤트 이름 버저닝/관리 부담이 생긴다.
메세지 Body 기반 기능 분리
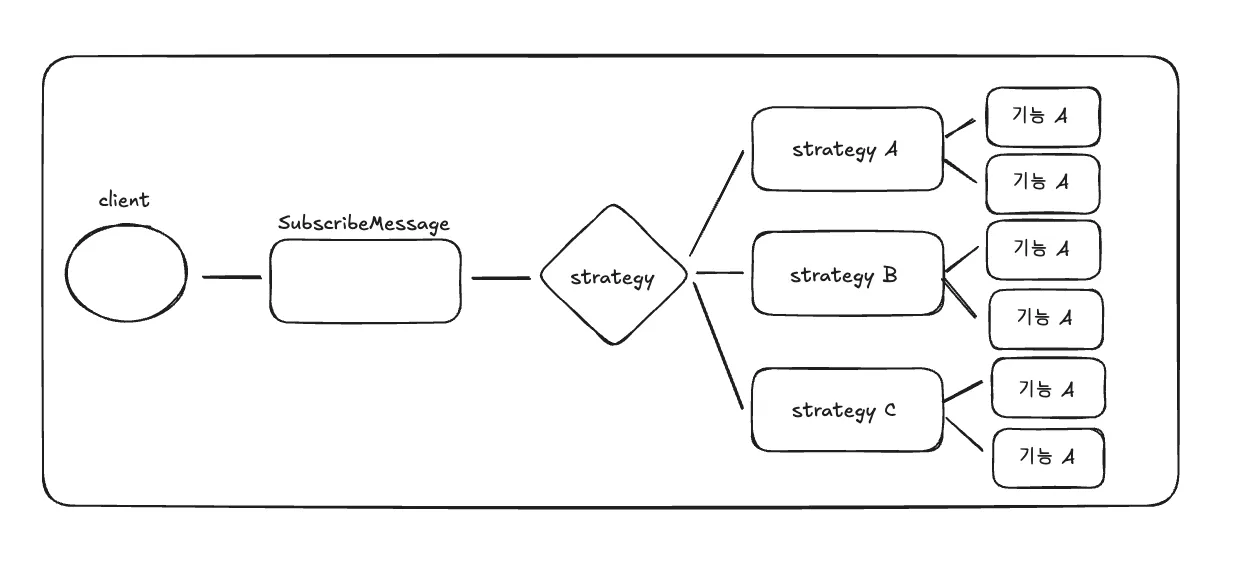
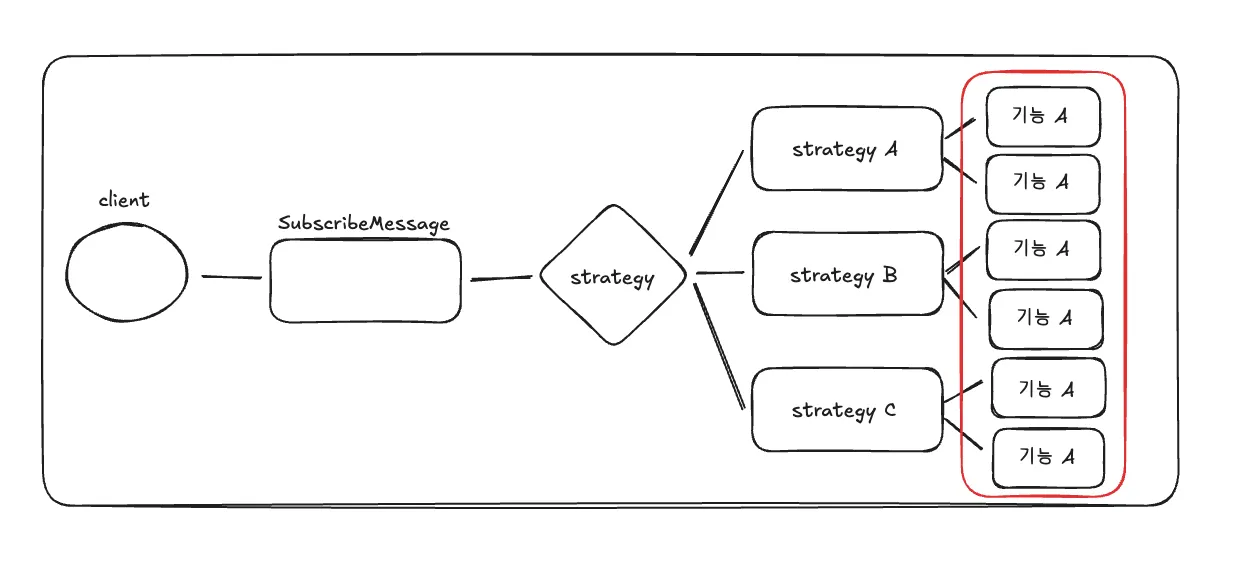
GEM의 폼 빌더 기능에서 차용하고 있는 구조인데요, 네임스페이스 하나에 이벤트도 한개를 두고, Message Body의 내용에 따라서 기능을 분리한 구조입니다.
예시로 아래와 같이 구성할 수 있습니다.
네임스페이스: 기능별 하나 (ex. chat)이벤트 이름: 각 네임스페이스마다 1개 (ex. 항상 edit)payload: 각 액션 및 블록마다 전용 구조를 가져감
// 예시
{block: "question", action: "create", data: {...}}
장점과 단점은 아래와 같아요.
장점
- 모든 메시지가 동일한 핸들러를 타니 공통 로깅/권한/검증 로직 묶기 쉽습니다.
- 네임스페이스별 미들웨어만 관리하면 됩니다.
- 메시지 이름이 하나라서 클라이언트도 핸들러 등록이 단순합니다.
단점
- payload 라우팅 switch-case가 커집니다.
- 이벤트별 흐름을 추적하려면 payload를 봐야 해서 관측성이 떨어집니다.
- 타입 안전성/스키마 검증을 차등 적용하기 어렵습니다.
스펙을 명시해야하는 부분
이벤트 타입별 기능 분리(기능당 이벤트)
위 구조와 같은 경우에는 네임스페이스와 이벤트 구조를 기준으로 메시지, 페이로드, 응답 형태가 달라지기 때문에, 이벤트 계층마다 주고받을 스펙을 정의해 두는 것이 좋습니다.
메세지 Body 기반 기능 분리
위 구조와 같은 경우에는 이벤트 이후에 비즈니스 로직에서 전략 단계를 모두 거친 뒤에 특정 액션(메세지 페이로드)서부터 메시지와 응답이 달라지므로, 해당 계층에서 주고받을 정보를 명시적으로 정의해 두면 됩니다.
그러면 우리 서비스에서는 비즈니스 로직의 서비스 메서드에 그 정보를 정의하는 게 가장 적절하겠습니다.
nestjs-asyncapi?
소켓 통신 명세를 데코레이터 기반으로 손쉽게 기술할 수 있는 라이브러리를 찾던 중, nestjs-asyncapi를 검토해 보았습니다.
[
GitHub - flamewow/nestjs-asyncapi: NestJS AsyncAPI module - generate documentation of your event-based services using decorators NestJS AsyncAPI module - generate documentation of your event-based services using decorators - flamewow/nestjs-asyncapi](https://github.com/flamewow/nestjs-asyncapi)
사용 예시
import { Logger } from '@nestjs/common';
import {
  ConnectedSocket,
  MessageBody,
  OnGatewayDisconnect,
  OnGatewayInit,
  SubscribeMessage,
  WebSocketGateway,
  WebSocketServer,
} from '@nestjs/websockets';
import { Namespace, Server } from 'socket.io';
import { Socket } from 'socket.io-client';
import { FelinesService } from './/felines.service';
import { CreateFelineDto } from './dto';
import { FelineExtendedRto, FelineRto } from './rto';
import { AsyncApiPub, AsyncApiSub } from '#lib';

const EventPatternsWS = {
  createFeline: 'ws/create/feline',
};

/**
 * How to use AsyncApi in a websockets
 */
@WebSocketGateway({ transports: ['websocket'], namespace: 'ws' })
export class FelinesGateway implements OnGatewayInit, OnGatewayDisconnect {
  @WebSocketServer()
  private readonly server: Server;
  private readonly logger: Logger = new Logger(FelinesGateway.name);

  constructor(private readonly felinesService: FelinesService) {}

  afterInit(nsp: Namespace) {
    this.logger.log(`Gateway server init: ${nsp?.name}`);
  }

  handleDisconnect(client: Socket) {
    this.logger.log(`Client disconnected: ${client.id}`);
  }

  @SubscribeMessage(EventPatternsWS.createFeline)
  @AsyncApiPub({
    channel: EventPatternsWS.createFeline,
    message: {
      payload: CreateFelineDto,
    },
  })
  async createFeline(
    @ConnectedSocket() client: Socket,
    @MessageBody() createFelineDto: CreateFelineDto,
  ) {
    this.logger.log(
      `data from client ${client.id} : ${JSON.stringify(createFelineDto)}`,
    );

    const feline = await this.felinesService.create(createFelineDto);
    await this.emitCreatedFeline(new FelineRto({ payload: feline }));
  }

  @AsyncApiSub({
    channel: EventPatternsWS.createFeline,
    message: [
      {
        name: 'oneOf demo #1',
        payload: FelineRto,
      },
      {
        name: 'oneOf demo #2',
        payload: FelineExtendedRto,
      },
    ],
  })
  async emitCreatedFeline(felineRto: FelineRto) {
    this.server.emit(EventPatternsWS.createFeline, felineRto);
  }
}
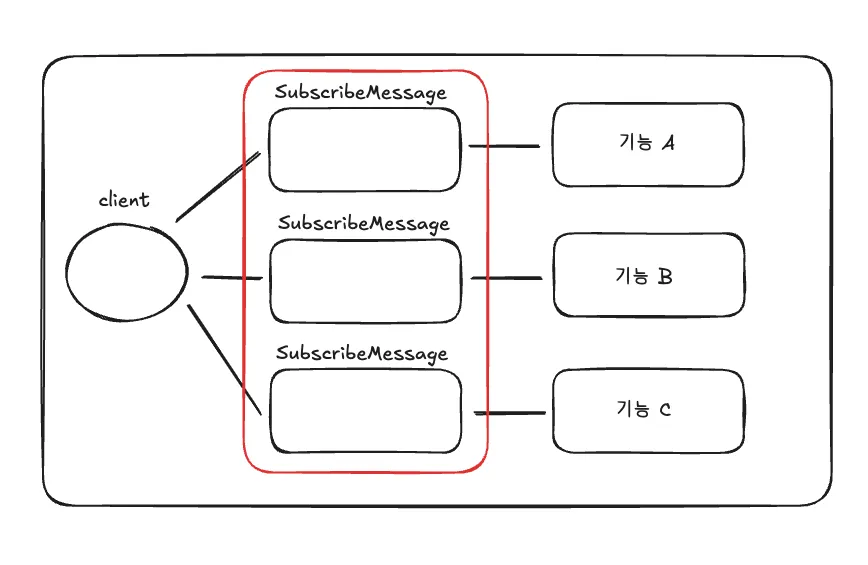
살펴보니 nestjs-asyncapi는 publish / subscribe 메서드마다 채널과 메시지를 명시하도록 설계되어 있어, 이벤트 타입별로 구조가 분리되어 있다는 전제를 깔고 있다고 볼 수 있습니다.
@SubscribeMessage(EventPatternsWS.createFeline)
@AsyncApiPub({
    channel: EventPatternsWS.createFeline,
    message: {
      payload: CreateFelineDto,
    },
})
예제에서도 볼 수 있듯이 channel: 'create/feline'처럼 기능마다 이벤트 이름(혹은 채널)을 분리해 두고, 각 기능에 맞는 DTO를 메시지 페이로드에 연결하는 방식을 기대하고 있습니다.
반면 저희 서비스처럼 하나의 네임스페이스와 이벤트 이름 하나만 두고, payload의 block 같은 필드로 흐름을 분기하는 패턴을 그대로 문서화하려면 몇 가지 문제가 보입니다.
문제점
첫째, 메시지 정의가 페이로드 타입 하나에 묶이는 구조라서, 페이로드 내부에서 block별로 다른 스키마를 표현하기 어렵습니다. 결국 any나 거대한 DTO로 통합해야 하는데, 그러면 문서화의 이점이 크게 줄어듭니다. 뭐 사실 기술적으로는 가능하겠지만, 전략 + 액션 조합 개수만큼 DTO를 명세에 넣어야 한다는 뜻이기도 합니다.
@AsyncApiSub({
  channel: 'edit',
  message: [
    {
      name: 'DTO1',
      payload: DTO1,
    },
    {
      name: 'DTO2',
      payload: DTO2,
    },
    {
      name: 'DTO3',
      payload: DTO3,
    },
    {
      name: 'DTO4',
      payload: DTO4,
    },
    ... // 무한하게 확장한다.
  ],
})
둘째, 이벤트 이름을 하나만 쓰면 AsyncAPI 문서에도 채널이 하나만 표시됩니다. 다른 개발자가 문서를 봤을 때 어떤 타입이 오가는지 직관적으로 파악하기 힘듭니다. 문서에는 채널 하나만 보이지만, 실제로는 그 안에 엄청난 분기와 상세 내용과 기능들이 숨겨져 있는 셈이기 때문입니다.
그래서 그냥 만들기로 했다

결국 완전히 커스텀한 방식으로 만들기로 했습니다.
사실 AsyncAPI는 OpenAPI처럼 YAML 문법이 정해져 있으니, 우리가 가진 자원과 원하는 명세를 이 구조로 동적으로 변환하기만 하면 됩니다.
- 이러한 정보들은 DTO 클래스와 데코레이��를 통해 수집하면 됩니다.
문서화 뷰 또한 asyncapi-react 같은 오픈소스 UI를 HTML에 적용해 간단하게 해결할 수 있습니다.
[
GitHub - asyncapi/spec: The AsyncAPI specification allows you to create machine-readable definitions of your asynchronous APIs. The AsyncAPI specification allows you to create machine-readable definitions of your asynchronous APIs. - asyncapi/spec](https://github.com/asyncapi/spec) [
GitHub - asyncapi/asyncapi-react: React component for rendering documentation from your specification in real-time in the browser. It also provides a WebComponent and bundle for Angular and Vue React component for rendering documentation from your specification in real-time in the browser. It also provides a WebComponent and bundle for Angular and Vue - asyncapi/asyncapi-react](https://github.com/asyncapi/asyncapi-react)
Module
import { Module } from '@nestjs/common';
import { DiscoveryModule } from '@nestjs/core';

import { SocketDocsController } from './controller/socket-docs.controller';
import { AsyncApiGeneratorService } from './service/asyncapi-generator.service';
import { SocketDocsService } from './service/socket-docs.service';

@Module({
	imports: [DiscoveryModule],
	providers: [SocketDocsService, AsyncApiGeneratorService],
	controllers: [SocketDocsController],
	exports: [SocketDocsService, AsyncApiGeneratorService],
})
export class SocketDocsModule {}
WebSocket API 문서화를 위한 모듈이다. 서비스와 컨트롤러에 대해서는 아래에서 알아보자.
decorator
export function SocketDocs(options: SocketDocsOptions): MethodDecorator {
	return (
		target: any,
		propertyKey: string | symbol,
		descriptor: PropertyDescriptor,
	) => {
		// 메서드의 파라미터 타입을 가져옵니다 (첫 번째 파라미터가 DTO)
		const paramTypes = Reflect.getMetadata(
			'design:paramtypes',
			target,
			propertyKey,
		);
		const requestDto = options.requestDto || paramTypes?.[0];

		if (!requestDto) {
			console.warn(
				`Warning: requestDto could not be inferred for ${String(propertyKey)}. ` +
					`Please specify it explicitly in the decorator options.`,
			);
		}

		// 메타데이터 생성
		const metadata: SocketDocsMetadata = {
			...options,
			requestDto,
		};

		// 메서드에 메타데이터 저장
		Reflect.defineMetadata(SOCKET_DOCS_KEY, metadata, descriptor.value);

		// 클래스에 메타데이터 목록 저장 (나중에 수집용)
		const existingMetadata: SocketDocsMetadata[] =
			Reflect.getMetadata(SOCKET_DOCS_METADATA, target.constructor) || [];

		existingMetadata.push(metadata);
		Reflect.defineMetadata(
			SOCKET_DOCS_METADATA,
			existingMetadata,
			target.constructor,
		);

		return descriptor;
	};
}
SocketDocs 데코레이터는 WebSocket 핸들러 메서드에 문서화용 메타데이터를 붙이기 위한 유틸입니다.
동작 흐름은 다음과 같아요.
Step 0) 예시 데코레이터
@SocketDocs({
	message: 'edit',
	block: 'checkboxValidation',
	action: 'create',
	summary: '체크박스 검증 생성',
	description:
		'체크박스 질문에 대한 검증 규칙을 생성합니다. 필수 여부를 설정할 수 있습니다.',
	requestDto: CreateCheckboxValidationDto,
	examples: {
		request: {
			message: 'edit',
			block: 'checkboxValidation',
			action: 'create',
			submissionId: 'submission_123',
			data: {
				questionId: 'question_456',
				required: true,
			},
		},
		response: {
			success: true,
			data: {
				id: 'checkboxValidation_789',
			},
		},
	},
	tags: ['checkboxValidation', 'create'],
})
예시로 위와 같이 데코레이터를 사용한다고 가정합니다.
해당 데코레이터 세팅을 기반으로 단계별로 동작 방식을 알아보겠습니다.
Step 1) 데코레이터 적용 시점 (클래스 로드 시)
target = CheckboxValidationStrategy.prototype
propertyKey = 'execute'
descriptor = { value: [Function: execute], ... }
해당 데코레이터가 달려있는 클래스가 로드될 때, 적용됩니다.
해당 데코레이터를 CheckboxValidationStrategy 클래스에 달아놓으면, 해당 클래스가 인스턴스화되고 로드될때 같이 적용되겠습니다.
Step 2) RequestDto 추론
// Reflect.getMetadata('design:paramtypes', ...) 결과
paramTypes = [CreateCheckboxValidationDto]

// options.requestDto가 명시되어 있으므로
requestDto = CreateCheckboxValidationDto  // options에서 가져옴
option에 명시적으로 명시한 DTO 클래스를 가져옵니다.
@SocketDocs({
	...
	requestDto: CreateCheckboxValidationDto,
	...
})
만약 따로 명시하지 않았다면, 데코레이터가 적용된 메서드의 파라미터 중 첫 번째 파라미터를 확인합니다.
@SocketDocs({
	... // requestDto를 명시하지 않음
})
private update(
	@Data()
	{ id, required, minLength, maxLength }: UpdateCheckboxValidationDto,
) {
위와 같이 update 메서드의 첫 번째 파라미터의 타입은 UpdateCheckboxValidationDto 클래스이기 때문에, 해당 DTO를 사용한다고 판단하고 넣어줄 수 있습니다.
Step 3) 메타데이터 객체 생성
metadata = {
	message: 'edit',
	block: 'checkboxValidation',
	action: 'create',
	summary: '체크박스 검증 생성',
	description: '체크박스 질문에 대한 검증 규칙을 생성합니다...',
	requestDto: CreateCheckboxValidationDto,  // DTO 클래스 참조
	examples: {
		request: {
			message: 'edit',
			block: 'checkboxValidation',
			action: 'create',
			submissionId: 'submission_123',
			data: {
				questionId: 'question_456',
				required: true,
			},
		},
		response: {
			success: true,
			data: { id: 'checkboxValidation_789' },
		},
	},
	tags: ['checkboxValidation', 'create'],
}
위에서 가져온 requestDto를 포함한 메타데이터 정보가 담긴 객체를 만들어준다.
Step 4) 메타데이터 저장
이제 가져온 메타데이터를 두곳에 저장하게 된다.
첫째, 메서드에 저장 (descriptor.value)
Reflect.defineMetadata(SOCKET_DOCS_KEY, metadata, 메서드)
메서드에 대한 메타데이터를 저장한다.
// 사용법
const methodDoc = Reflect.getMetadata(SOCKET_DOCS_KEY, someMethod);
특정 메서드의 문서만 조회할 때 사용된다.
둘째, 클래스에 저장 (target.constructor)
// 클래스에 메타데이터 목록 저장 (나중에 수집용)
const existingMetadata: SocketDocsMetadata[] =
	Reflect.getMetadata(SOCKET_DOCS_METADATA, target.constructor) || [];

existingMetadata.push(metadata);

Reflect.defineMetadata(
	SOCKET_DOCS_METADATA,
	existingMetadata,
	target.constructor,
);
기존 수집한 전체 클래스에 대한 메타데이터 리스트에 추가해서 저장한다.
// 클래스 레벨에서 모든 메타데이터 가져오기
const metadata: SocketDocsMetadata[] =
    Reflect.getMetadata(SOCKET_DOCS_METADATA, provider.constructor);
클래스의 모든 문서를 한 번에 수집할 때 사용된다.
socket-docs.service
import { Injectable, Logger, OnModuleInit } from '@nestjs/common';
import { DiscoveryService } from '@nestjs/core';

import {
	SOCKET_DOCS_METADATA,
	SocketDocsMetadata,
} from '../interface/socket-docs.interface';

@Injectable()
export class SocketDocsService implements OnModuleInit {
	private readonly logger = new Logger(SocketDocsService.name);
	private actions: SocketDocsMetadata[] = [];

	constructor(private readonly discoveryService: DiscoveryService) {}

	async onModuleInit() {
		await this.collectMetadata();
		this.logger.log(
			`Socket documentation initialized with ${this.actions.length} actions`,
		);
	}

	private async collectMetadata() {
		const providers = this.discoveryService.getProviders();

		providers.forEach(({ instance }) => {
			if (!instance?.constructor) {
				return;
			}

			const metadata = Reflect.getMetadata(
				SOCKET_DOCS_METADATA,
				instance.constructor,
			);

			if (metadata && Array.isArray(metadata)) {
				this.logger.debug(
					`Found ${metadata.length} actions in ${instance.constructor.name}`,
				);
				this.actions.push(...metadata);
			}
		});
	}

	getAllActions(): SocketDocsMetadata[] {
		return this.actions;
	}
}
모듈이 초기화될 때, 애플리케이션의 모든 클래스에 적용된 SocketDocs 메타데이터를 수집합니다.
- 메타데이터는 이미 위에서 살펴본 데코레이터를 통해 적용이 된 상태입니다.
- 모든
Provider에서 해당 소켓 액션 메타데이터를 수집합니다. (SOCKET_DOCS_METADATA)
수집한 데이터를 SocketDocsService 클래스의 필드인 actions 배열에 모아서 저장해둡니다.
싱글턴 인스턴스인 만큼 해당 값은 변하지 않게 됩니다.
앱이 살아있는 한 변경되지 않을 것이기 때문에, 필요할 때마다 접근해서 액션들을 사용하면 됩니다.
Controller
import { Controller, Get, Header, Res } from '@nestjs/common';
import { readFileSync } from 'fs';
import { join } from 'path';

import type { Response } from 'express';

import { AsyncApiGeneratorService } from '../service/asyncapi-generator.service';
import { SocketDocsService } from '../service/socket-docs.service';

/**
 * Socket Documentation Controller
 * Socket API 문서 엔드포인트를 제공합니다.
 */
@Controller('socket-docs')
export class SocketDocsController {
	constructor(
		private readonly docsService: SocketDocsService,
		private readonly asyncApiGenerator: AsyncApiGeneratorService,
	) {}

	/**
	 * AsyncAPI Spec JSON을 반환합니다.
	 * @route GET /socket-docs/spec
	 */
	@Get('spec')
	@Header('Content-Type', 'application/json')
	getSpec(@Res() res: Response) {
		const spec = this.asyncApiGenerator.generateSpec();
		return res.json(spec);
	}

	/**
	 * AsyncAPI Studio UI를 렌더링합니다.
	 * @route GET /socket-docs
	 */
	@Get()
	@Header('Content-Type', 'text/html')
	getUI(@Res() res: Response) {
		try {
			const htmlPath = join(__dirname, 'views', 'index.html');
			const html = readFileSync(htmlPath, 'utf-8');
			res.send(html);
		} catch (error) {
			res.status(500).send('Failed to load documentation UI');
		}
	}
}
이제 문서 페이지를 초기화, 문서 페이지에 필요한 데이터를 공급하는 API route를 담당하는 컨트롤러를 살펴보겠습니다.
간단하게 두 가지 route만 존재합니다. 내용은 아래와 같습니다.
/api/socket-docs
해당 route를 통해 소켓에 대한 문서를 확인할 수 있습니다.
/api/spec
- 앱에서 남긴 메타데이터를 바탕으로, AsyncAPI YAML 스펙에 맞게 동적으로 변환해야 합니다. 이렇게 변환된 정보들은 해당 API를 통해서 동적으로 가져올 수 있습니다.
/api/socket-docs
먼저 해당 route 부터 확인해보겠습니다.
해당 route는 간단하게 html을 가져오는 역할만 합니다.
index.html
<!DOCTYPE html>
<html lang="ko">
<head>
<meta charset="UTF-8">
<meta name="viewport" content="width=device-width, initial-scale=1.0">
<title>Socket API Documentation</title>
<link rel="stylesheet" href="https://unpkg.com/@asyncapi/react-component@latest/styles/default.min.css">
<style>
body {
margin: 0;
padding: 0;
font-family: -apple-system, BlinkMacSystemFont, 'Segoe UI', Roboto, 'Helvetica Neue', Arial, sans-serif;
}
.header {
background: #1e293b;
color: white;
padding: 1rem 2rem;
box-shadow: 0 2px 4px rgba(0,0,0,0.1);
}
.header h1 {
margin: 0;
font-size: 1.5rem;
}
.header p {
margin: 0.5rem 0 0;
opacity: 0.8;
font-size: 0.9rem;
}
#asyncapi {
padding: 2rem;
}
.loading {
display: flex;
align-items: center;
justify-content: center;
height: 50vh;
font-size: 1.2rem;
color: #64748b;
}
</style>
</head>
<body>
<div class="header">
<h1>🔌 Socket API Documentation</h1>
<p>폼 빌더 WebSocket API 문서 - Strategy 패턴 기반 통합 메시지</p>
</div>
<div id="asyncapi">
<div class="loading">문서를 로딩중입니다...</div>
</div>
<script src="https://unpkg.com/@asyncapi/react-component@latest/browser/standalone/index.js"></script>
<script>
(async function() {
try {
const response = await fetch('/api/socket-docs/spec');
const spec = await response.json();
AsyncApiStandalone.render({
schema: spec,
config: {
show: {
sidebar: true,
errors: true,
},
sidebar: {
showOperations: 'byDefault',
},
},
}, document.getElementById('asyncapi'));
} catch (error) {
document.getElementById('asyncapi').innerHTML =
'<div class="loading" style="color: #ef4444;">문서를 불러오는데 실패했습니다: ' + error.message + '</div>';
console.error('Failed to load AsyncAPI spec:', error);
}
})();
</script>
</body>
</html>
html 구조도 간단합니다.
@asyncapi/react-component의 CSS에 맞춰 스타일을 잡고, 동적으로 만들어진 스펙을 API로 불러옵니다.
const response = await fetch('/api/socket-docs/spec');
- 이 스펙은 앞서 모아 둔 메타데이터 기반의 action 배열을 AsyncAPI 스펙에 맞춰 가공한 결과입니다.
이러한 변환 작업을 담당하는 엔드포인트가 /api/socket-docs/spec이니, 이제 이 API를 살펴보겠습니다.
/api/socket-docs/spec
해당 route는 앞서 언급했듯이, 앱에서 남긴 메타데이터를 바탕으로, AsyncAPI YAML 스펙에 맞게 동적으로 변환하는 역할을 합니다.
const spec = this.asyncApiGenerator.generateSpec();
이제 이러한 역할을 담당하는 asyncApiGenerator에 대해 알아보겠습니다.
asyncapi-generator.service
@Injectable()
export class AsyncApiGeneratorService {
private readonly logger = new Logger(AsyncApiGeneratorService.name);
constructor(private readonly docsService: SocketDocsService) {}
generateSpec(): AsyncApiSpec {
const actions = this.docsService.getAllActions();
if (actions.length === 0) {
this.logger.warn('No actions found. Spec will be empty.');
}
return {
asyncapi: '3.0.0',
info: {
title: 'Socket API Documentation',
version: '1.0.0',
description:
'폼 빌더 소켓 API 문서 - Strategy 패턴 기반의 통합 edit 메시지',
},
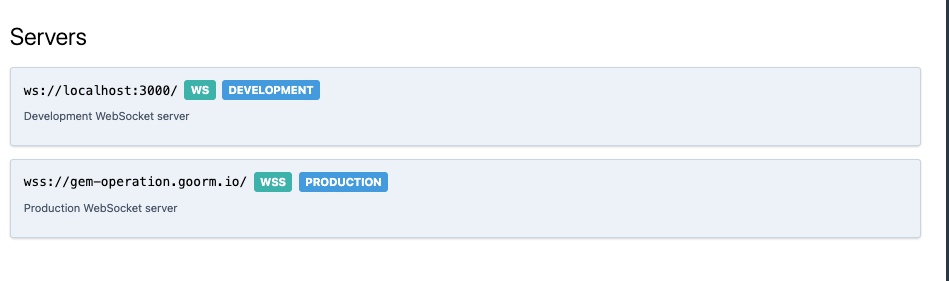
servers: {
development: {
host: 'localhost:3000',
protocol: 'ws',
description: 'Development WebSocket server',
pathname: '/draft-submission',
},
production: {
host: 'api.example.com',
protocol: 'wss',
description: 'Production WebSocket server',
pathname: '/draft-submission',
},
},
channels: this.generateChannels(actions),
operations: this.generateOperations(actions),
components: {
schemas: this.generateSchemas(actions),
messages: this.generateMessages(actions),
},
} as any;
}
...
}
이제 actions를 토대로 스펙과 문법을 맞춰 정리하면 됩니다. 핵심은 channels, operations, components 세 부분을 채워 완성하는 것 입니다.
generateChannels
채널의 역할
[
Channel What is a channel?
A channel is a mechanism created by the server that facilitates the organization and transmission of messages. Depending on the used protocol, users can define channels as a topic,](https://asyncapi.com/docs/concepts/channel)
우선 AsyncAPI에서 채널은 무엇을 의미하는지 부터 알아봐야겠습니다.
채널은 클라이언트가 어디로 연결해서 어떤 메시지를 주고받을 수 있는지를 명확히 보여 주는 문서 단위입니다.
채널(Channel)은 아래와 같은 역할을 합니다.
- WebSocket의 실제 엔드포인트 주소 (/draft-submission)
- 해당 채널에서 주고받을 수 있는 모든 메시지 타입 명시
- 채널의 목적과 사용 방법 명시
- 클라이언트가 어떤 경로로 연결하고 어떤 메시지를 보낼 수 있는지 정의
실제 사용 예시
// 클라이언트가 WebSocket 연결
// 이 채널에서 사용 가능한 메시지들 전송
socket.emit('question:update', { /* ... */ });
socket.emit('step:delete', { /* ... */ });
이렇게 channels는 어떤 WebSocket 경로에서 어떤 메시지들을 사용할 수 있는지를 정의하는 API 명세서 역할을 합니다.
저희 socketIO 사용 환경에서는 channel이 namespace라고 보면 됩니다.
코드
private generateChannels(
actions: SocketDocsMetadata[],
): Record<string, AsyncApiChannel> {
const channels: Record<string, AsyncApiChannel> = {};
// messages 객체를 미리 생성 (두 채널에서 재사용)
const messagesRef = actions.reduce((acc, action) => {
const messageId = this.getOperationId(action);
acc[messageId] = {
$ref: `#/components/messages/${messageId}`,
};
return acc;
}, {} as Record<string, any>);
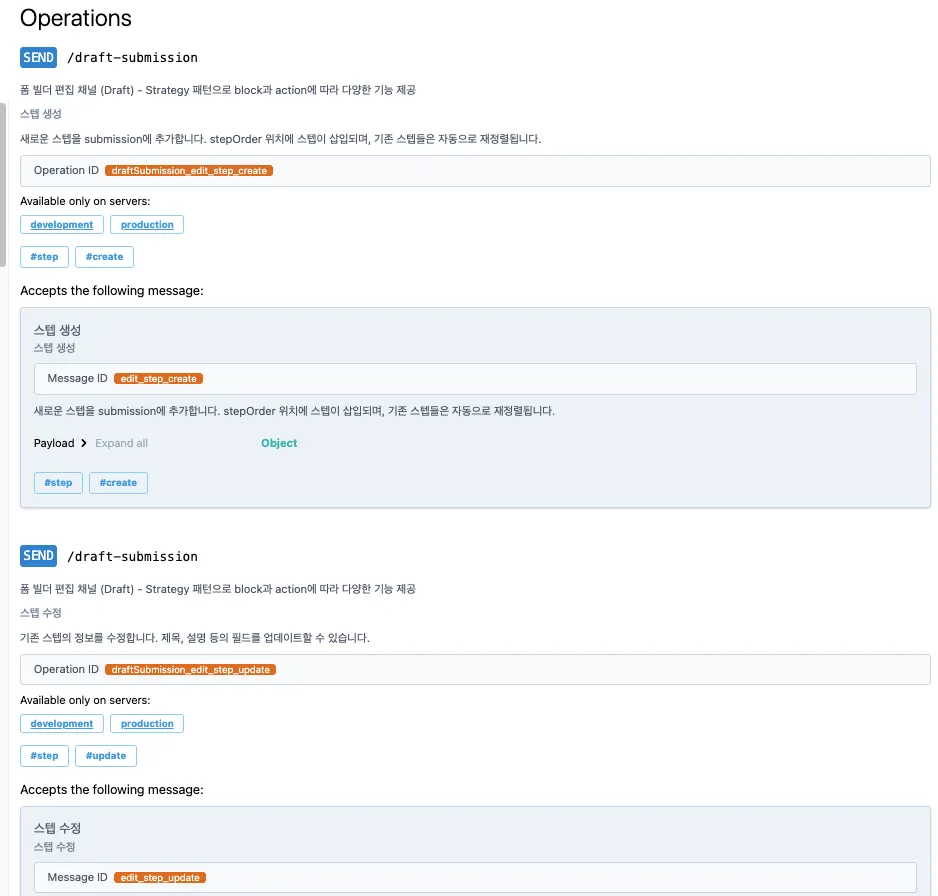
// draftSubmission 채널
channels.draftSubmission = {
address: '/draft-submission',
description:
'폼 빌더 편집 채널 (Draft) - Strategy 패턴으로 block과 action에 따라 다양한 기능 제공',
messages: messagesRef,
};
// submissionBuilder 채널
channels.submissionBuilder = {
address: '/submission-builder',
description:
'폼 빌더 편집 채널 (Builder) - Strategy 패턴으로 block과 action에 따라 다양한 기능 제공',
messages: messagesRef,
};
return channels;
}
이 메서드는 AsyncAPI 3.0 규격에 맞춘 채널(Channel) 정의를 만들어 줍니다.
WebSocket에서 채널은 클라이언트와 서버가 메시지를 주고받는 통로라 보면 되고, 저희 폼 빌더 서비스에서는 현재는 두 채널을 운영한다. (draft-submission, submission-builder)
흐름
흐름은 아래와 같이 진행된다.
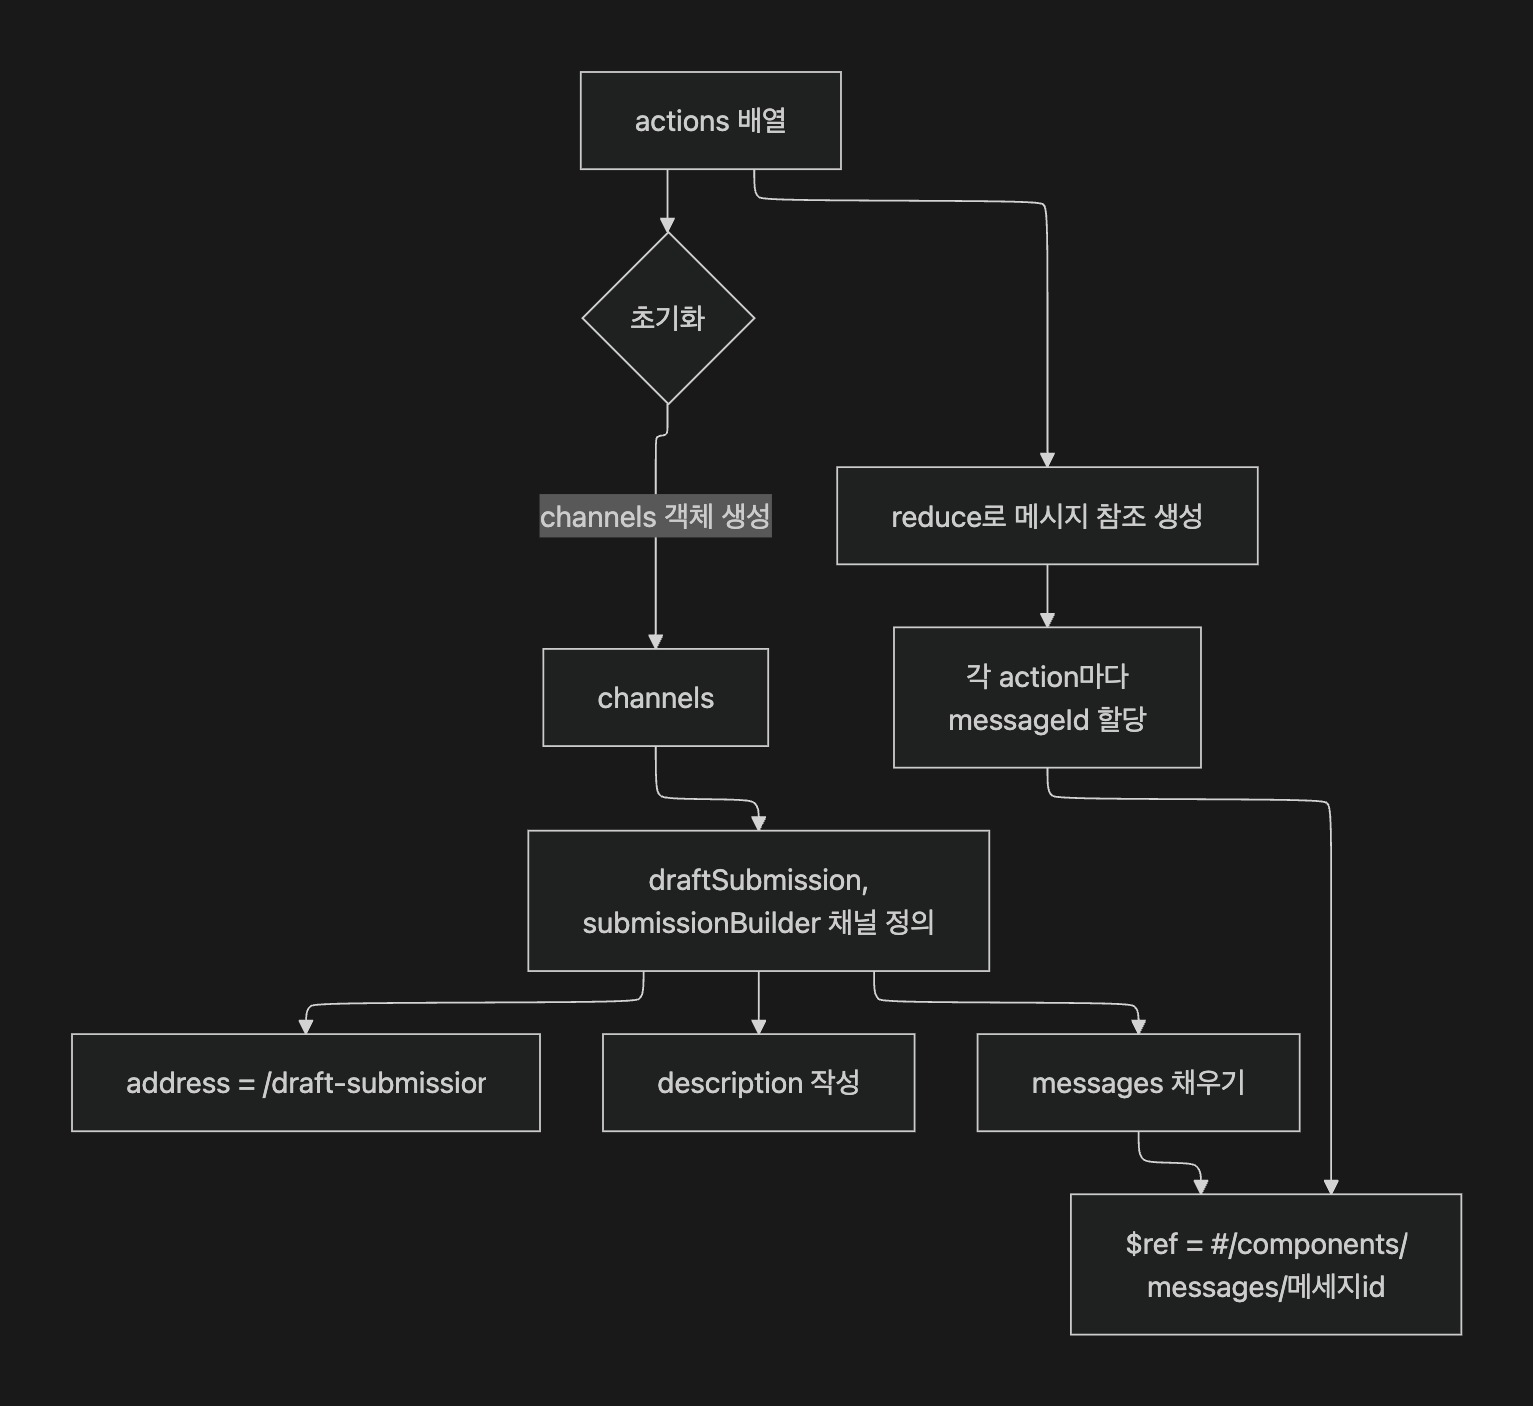
- 비어 있는 channels 객체를 만들어 채널 정의를 담을 준비를 한다.
- actions를 reduce로 순회하며 각 항목을 메시지 참조로 바꾼다.
- 각 액션에 고유한 messageId를 붙인다.
- 실제 메시지 스펙은
#/components/messages/{messageId}에 정의해 두고 $ref로 참조한다. - draftSubmission, submissionBuilder 채널을 구성한다.
address: 실제 WebSocket 경로(/draft-submission)
- description: 이 채널이 하는 일
- messages: 이 채널에서 오갈 메시지 타입 목록
예시
아래와 같은 액션이 있다고 가정하겠습니다.
const actions = [
	{
		block: 'question',
		action: 'create',
		event: 'question:create',
		// ... 기타 메타데이터
	},
	{
		block: 'question',
		action: 'update',
		event: 'question:update',
		// ... 기타 메타데이터
	},
	{
		block: 'step',
		action: 'delete',
		event: 'step:delete',
		// ... 기타 메타데이터
	}
];
결과는 아래와 같이 채널과 메세지들이 생성됩니다.
{
	"draftSubmission": {
	    "address": "/draft-submission",
		"description": "폼 빌더 편집 채널 - Strategy 패턴으로 block과 action에 따라 다양한 기능 제공",
		"messages": {
			"questionCreate": {
				"$ref": "#/components/messages/questionCreate"
			},
			"questionUpdate": {
				"$ref": "#/components/messages/questionUpdate"
			},
			"stepDelete": {
				"$ref": "#/components/messages/stepDelete"
			}
		}
	}
	...
}
generateOperations
오퍼레이션의 역할
[
Adding operations In a messaging system, ‘operations’ are how messages are sent and received between participants or components. In AsyncAPI, understanding operations helps you see how the system sends asynchronous mes](https://asyncapi.com/docs/concepts/asyncapi-document/adding-operations)
우선 이번에도 AsyncAPI에서 오퍼레이션은 무엇을 의미하는지 부터 알아봐야겠습니다.
AsyncAPI에서 오퍼레이션은 메시징 시스템에서 실제로 어떤 작업을 수행할 수 있는지를 설명하는 단위입니다.
특정 채널을 통해 메시지를 발행하거나 수신하는 행동을 이런 목적, 이런 요건으로 수행할 수 있다라고 문서화하는 역할을 합니다.
즉, 한 채널에 어떤 상호작용이 가능한지, 예를 들어 누가 메시지를 보내고, 누가 받는지, 어떤 시나리오인지를 표준 형식으로 풀어놓은 것인데요, 이를 통해 API 사용자는 시스템의 기능과 메시지 흐름을 한눈에 파악할 수 있습니다.
코드
private generateOperations(
actions: SocketDocsMetadata[],
): Record<string, AsyncApiOperation> {
const operations: Record<string, AsyncApiOperation> = {};
const channels = ['draftSubmission', 'submissionBuilder'];
channels.forEach((channelName) => {
actions.forEach((action) => {
const operationId = this.getOperationId(action);
// 채널별로 구분된 operationId
const fullOperationId = `${channelName}_${operationId}`;
operations[fullOperationId] = {
action: 'send',
channel: {
$ref: `#/channels/${channelName}`,
},
summary: action.summary,
description: action.description || action.summary,
tags: action.tags
? action.tags.map((tag) => ({ name: tag }))
: undefined,
messages: [
{
$ref: `#/channels/${channelName}/messages/${operationId}`,
},
],
};
});
});
return operations;
}
이 메서드는 AsyncAPI 스펙의 오퍼레이션(Operations) 섹션을 생성하는 역할을 합니다.
Socket 액션 메타데이터를 기반으로 각 채널별 오퍼레이션(작업 단위) 정의를 생성합니다. 위에서도 언급했듯이 오퍼레이션은 클라이언트가 특정 채널에서 수행할 수 있는 구체적인 작업을 나타냅니다.
operations 객체 구조
operations[fullOperationId] = {
    action: 'send',
    channel: { $ref: #/channels/${channelName} },
    summary: action.summary,
    description: action.description || action.summary,
    tags: action.tags ? action.tags.map((tag) => ({ name: tag })) : undefined,
    messages: [{ $ref: #/channels/${channelName}/messages/${operationId}
  }],
};
상세 필드는 각각 아래와 같은 의미를 가지고 있습니다.
흐름
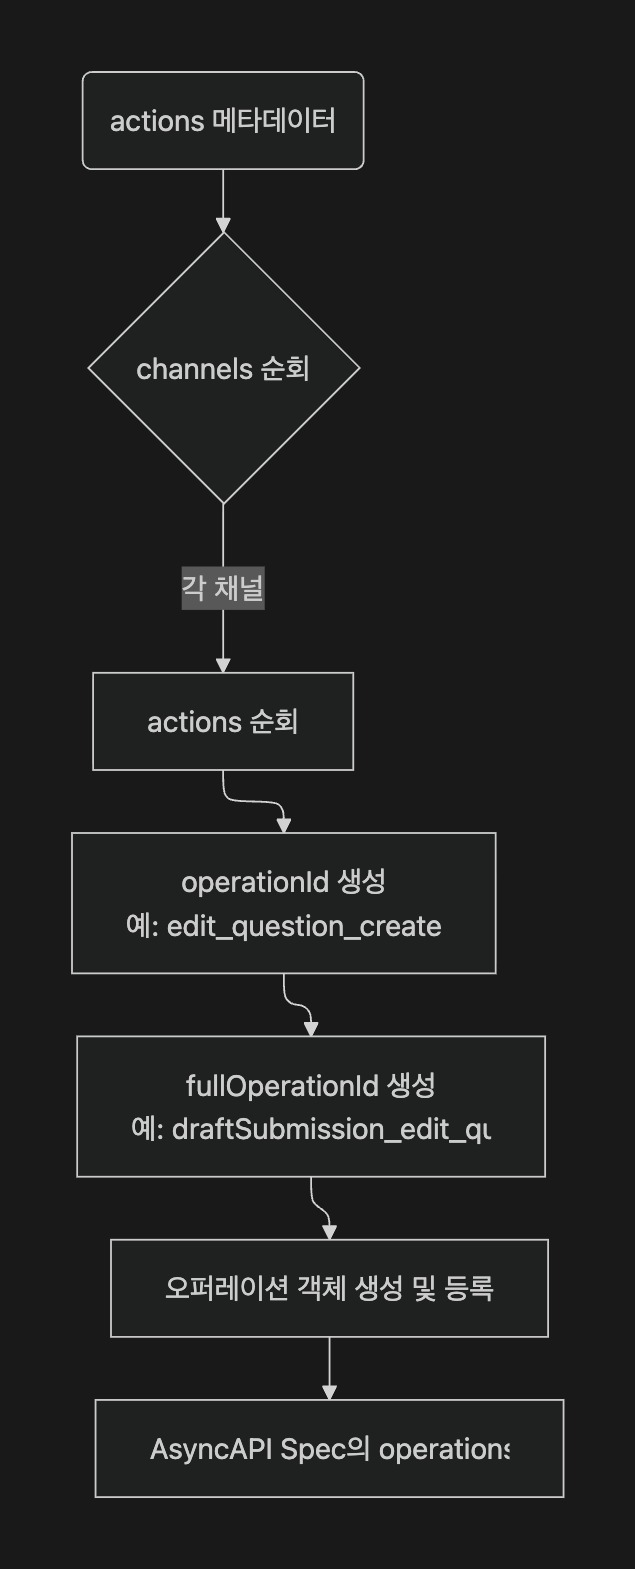
const operationId = this.getOperationId(action);
// 예: 'edit_question_create'

const fullOperationId = `${channelName}_${operationId}`;
// 예: 'draftSubmission_edit_question_create'

operations[fullOperationId] = {
	...
};
우선 오퍼레이션 ID를 생성합니다. 네이밍은 아래와 같이 진행됩니다.
- operationId: 메시지 타입 식별자 (채널 독립적)
- fullOperationId: 채널을 포함한 고유 식별자 (채널 구분)
- 형식:
{채널명}*{메시지명}*{블록}_{액션}
이를 채널명과 함께 합쳐서 고유하게 만들고, operation명으로 사용합니다.
operation 스펙에 맞는 객체를 생성합니다.
예시
// 입력
actions = [
	{
		message: 'edit',
		block: 'question',
		action: 'create',
		summary: '질문 생성',
		description: '새로운 질문 블록을 추가합니다',
		tags: ['question', 'create']
	},
	{
		message: 'edit',
		block: 'step',
		action: 'delete',
		summary: '스텝 삭제',
		tags: ['step']
	}
]

// 출력
{
  "draftSubmission_edit_question_create": {
    "action": "send",
    "channel": {
      "$ref": "#/channels/draftSubmission"
    },
    "summary": "질문 생성",
    "description": "새로운 질문 블록을 추가합니다",
    "tags": [
      { "name": "question" },
      { "name": "create" }
    ],
    "messages": [
      {
        "$ref": "#/channels/draftSubmission/messages/edit_question_create"
      }
    ]
  },
  "draftSubmission_edit_step_delete": {
    "action": "send",
    "channel": {
      "$ref": "#/channels/draftSubmission"
    },
    "summary": "스텝 삭제",
    "description": "스텝 삭제",
    "tags": [
      { "name": "step" }
    ],
    "messages": [
      {
        "$ref": "#/channels/draftSubmission/messages/edit_step_delete"
      }
    ]
  },
  "submissionBuilder_edit_question_create": {
    "action": "send",
    "channel": {
      "$ref": "#/channels/submissionBuilder"
    },
    "summary": "질문 생성",
    "description": "새로운 질문 블록을 추가합니다",
    "tags": [
      { "name": "question" },
      { "name": "create" }
    ],
    "messages": [
      {
        "$ref": "#/channels/submissionBuilder/messages/edit_question_create"
      }
    ]
  },
  "submissionBuilder_edit_step_delete": {
    "action": "send",
    "channel": {
      "$ref": "#/channels/submissionBuilder"
    },
    "summary": "스텝 삭제",
    "description": "스텝 삭제",
    "tags": [
      { "name": "step" }
    ],
    "messages": [
      {
        "$ref": "#/channels/submissionBuilder/messages/edit_step_delete"
      }
    ]
  }
}
위와 같이 특정 채널의 특정 오퍼레이션이 매핑이됩니다.
결국 저희 서비스에서 필요했던 블록 + 액션별 소켓 통신 스펙 작성이 가능한 뼈대가 만들어 진 것입니다.
위와 같이 오퍼레이션이 생성이 됩니다.
generateMessages
메시지의 역할
[
Message What is a message?
A message is a communication asset that transmits or exchanges information from a sender to the receiver through channels.
One message can also be defined as an event or command a](https://asyncapi.com/docs/concepts/message)
우선 이번에도 AsyncAPI에서 메세지는 무엇을 의미하는지 부터 알아봐야겠습니다.
AsyncAPI에서 메세지는 채널을 통해 전송되는 정보 묶음입니다.
보낸 쪽이 어떤 데이터를 적절한 형식(JSON, XML 등)으로 인코딩해 전달하고, 받는 쪽은 그 데이터를 소비하게 됩니다. 메시지에는 본문(payload)뿐 아니라 메시지를 설명하는 메타데이터(헤더나 속성)도 포함될 수 있습니다.
결국 메시지는 애플리케이션끼리 상태나 행동을 주고받게 해주는 기본 단위입니다.
코드
private generateMessages(
	actions: SocketDocsMetadata[],
): Record<string, AsyncApiMessageDefinition> {
	const messages: Record<string, AsyncApiMessageDefinition> = {};

	actions.forEach((action) => {
		const messageId = this.getOperationId(action);
		messages[messageId] = {
			name: messageId,
			title: action.summary,
			summary: action.summary,
			description: action.description || action.summary,
			tags: action.tags
				? action.tags.map((tag) => ({ name: tag }))
				: undefined,
			payload: {
				$ref: `#/components/schemas/${this.getRequestSchemaId(action)}`,
			},
			examples:
				action.examples?.request || action.examples?.response
					? [
							...(action.examples?.request
								? [
										{
											name: `${action.block}_${action.action}_request`,
											summary: `${action.summary} 요청 예제`,
											payload:
												action.examples.request,
										},
									]
								: []),
							...(action.examples?.response
								? [
										{
											name: `${action.block}_${action.action}_response`,
											summary: `${action.summary} 응답 예제`,
											payload:
												action.examples.response,
										},
									]
								: []),
						]
					: undefined,
		};
	});

	return messages;
}
이 메서드는 AsyncAPI 스펙의 메시지(Messages) 정의를 생성하는 역할을 합니다.
저장된 Socket 액션 메타데이터를 기반으로 각 메시지의 상세 정의를 생성합니다. 위에서 살펴 보았듯이 메시지는 채널을 통해 전송되는 실제 데이터 구조를 나타냅니다.
message 객체 구조
messages[messageId] = {
	name: messageId,
	title: action.summary,
	summary: action.summary,
	description: action.description || action.summary,
	tags: action.tags ? action.tags.map((tag) => ({ name: tag })) : undefined,
	payload: { $ref: #/components/schemas/${this.getRequestSchemaId(action)} },
	examples: /* ... */
};
상세 필드는 각각 아래와 같은 의미를 가지고 있습니다.
- name: 메시지 고유 식별자
- title: 메시지 제목
- summary: 메시지 요약
- description: 메시지 상세 설명 (없으면 summary 사용)
- tags: 메시지 분류용 태그
- payload.$ref: 메시지 데이터 스키마 참조
- examples: 요청/응답 예제 배열 (선택사항)
payload.$ref
payload: {
  $ref: #/components/schemas/${this.getRequestSchemaId(action)}
}
// 예: { $ref: '#/components/schemas/question_create_request' }
필드중에서 조금 눈여겨볼 필드는 해당 payload.$ref 필드인데요, 메시지 데이터 구조를 별도의 스키마로 분리하고 있습니다. (메세지 통신에 필요한 DTO에 대한 정보를 스키마로 따로 관리한다.)
중복 정의 방지 및 일관성 유지하기 위해서 components.schemas에 정의된 JSON Schema 재사용하고 있어요.
결국 나중에 살펴볼 스키마 생성 단계에서 생성한 스키마를 참조하기만 합니다.
examples
{
  ...,
  examples:
    action.examples?.request || action.examples?.response
      ? [
          ...(action.examples?.request
            ? [
                {
                  name: `${action.block}_${action.action}_request`,
                  summary: `${action.summary} 요청 예제`,
                  payload: action.examples.request,
                },
              ]
            : []),
          ...(action.examples?.response
            ? [
                {
                  name: `${action.block}_${action.action}_response`,
                  summary: `${action.summary} 응답 예제`,
                  payload: action.examples.response,
                },
              ]
            : []),
        ]
      : undefined,
};
- 요청·응답 예제가 존재하는지 확인합니다.
- action.examples.request가 있으면 요청 예제를 배열에 추가합니다.
- action.examples.response가 있으면 응답 예제를 배열에 추가합니다.
- 예제가 하나라도 있으면 배열을 반환하고, 없으면 undefined를 반환합니다.
그래서 요청 예제는 수동으로 잘 작성해야 합니다!
예시
// 입력
actions = [
  {
    message: "edit",
    block: "question",
    action: "create",
    summary: "질문 생성",
    description: "새로운 질문 블록을 폼에 추가합니다",
    tags: ["question", "create"],
    examples: {
      request: {
        message: "edit",
        block: "question",
        action: "create",
        submissionId: "sub-123",
        data: {
          title: "이름이 무엇인가요?",
          type: "SHORT_TEXT",
          required: true,
        },
      },
      response: {
        success: true,
        data: { questionId: "q-456" },
      },
    },
  },
];

// 출력
{
  edit_question_create: {
    name: "edit_question_create",
    title: "질문 생성",
    summary: "질문 생성",
    description: "새로운 질문 블록을 폼에 추가합니다",
    tags: [{ name: "question" }, { name: "create" }],
    payload: {
      $ref: "#/components/schemas/question_create_request",
    },
    examples: [
      {
        name: "question_create_request",
        summary: "질문 생성 요청 예제",
        payload: {
          message: "edit",
          block: "question",
          action: "create",
          submissionId: "sub-123",
          data: {
            title: "이름이 무엇인가요?",
            type: "SHORT_TEXT",
            required: true,
          },
        },
      },
      {
        name: "question_create_response",
        summary: "질문 생성 응답 예제",
        payload: {
          success: true,
          data: { questionId: "q-456" },
        },
      },
    ],
  },
};
위와 같이 오퍼레이션들에 사용될 메세지들이 매핑이됩니다.
저희 서비스에서 꼭 필요했던 핵심요소인 DTO 스펙을 담아낼 공간이 만들어 진 것입니다
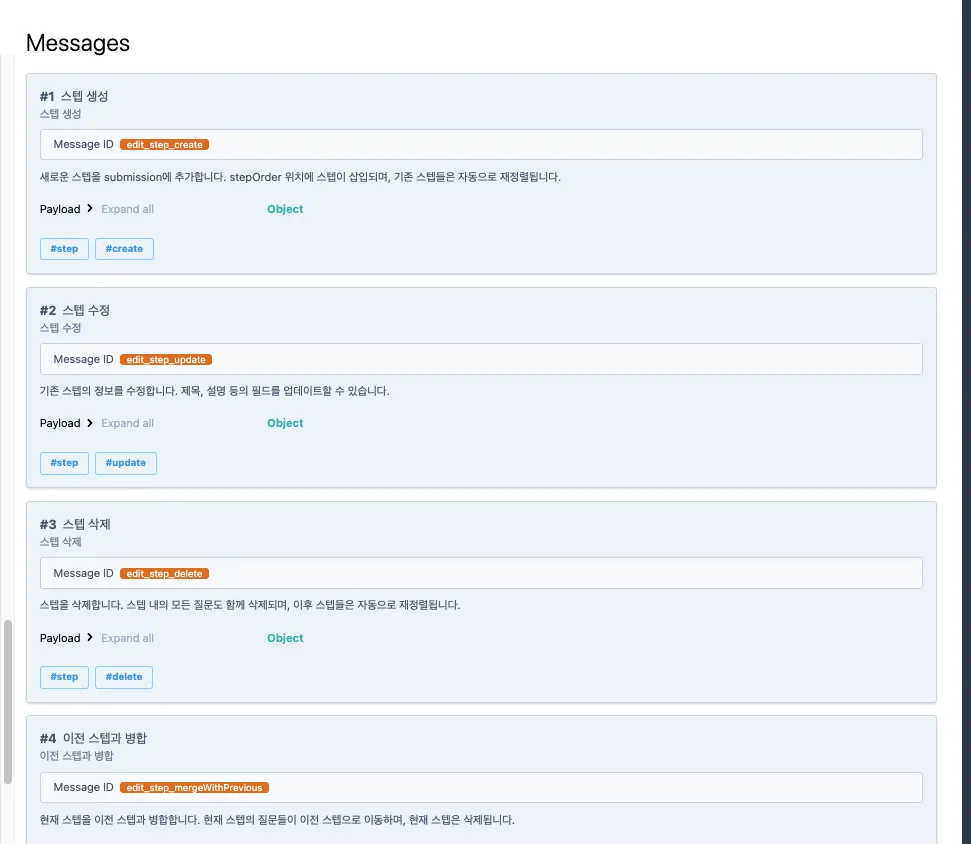
위와 같이 메세지들이 생성이 됩니다.
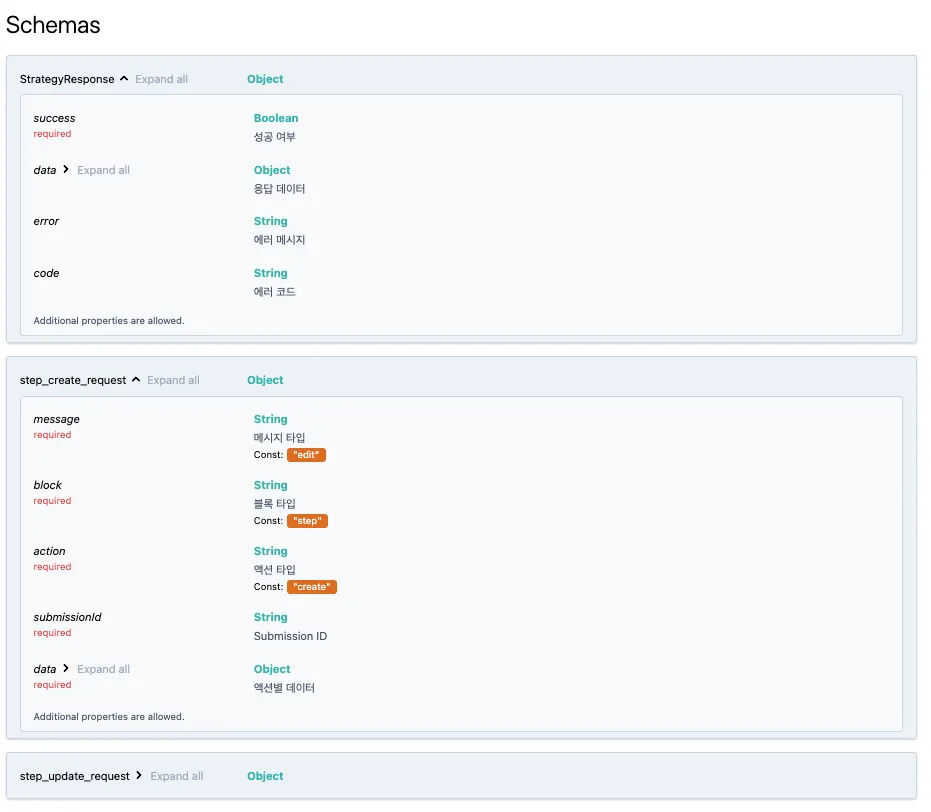
generateSchemas
스키마의 역할
[
Payload schema The payload schema sets the format, data types, and properties of a message. Such an approach ensures the message’s payload follows a specific structure and data format.
It’s recommended to use Async](https://asyncapi.com/docs/concepts/asyncapi-document/define-payload)
우선 이번에도 AsyncAPI에서 스키마는 무엇을 의미하는지 부터 알아봐야겠습니다.
AsyncAPI에서 스키마는 메시지의 페이로드가 어떤 구조와 타입을 따라야 하는지를 명세한 하나의 설계도입니다.
뭐 평소에 알고 있는 스키마의 정의대로, 결국 이 메시지는 어떤 필드를 갖고, 각 필드는 어떤 자료형이며, 필수인지 선택인지 등을 정해 주는 역할을 합니다.
주로 AsyncAPI Schema(=JSON Schema 상위호환)를 쓰는 게 권장되지만, Avro나 Protobuf처럼 다른 스키마 포맷도 쓸 수 있습니다.
정의 방식은 아래와 같이 네가지 방식이 있습니다. 저희는 컴포넌트 참조 방식을 사용할 예정입니다.
- Inline 정의: 메시지 안에서 바로 JSON Schema를 적는 방식
- components 참조:
#/components/schemas/User처럼 공용 스키마를 참조 - 원격 참조:
https://schemas.example.com/user같은 외부 URL - 로컬 파일 참조:
./user-signedup.json처럼 프로젝트 내부 파일을 지정
코드
private generateSchemas(
actions: SocketDocsMetadata[],
): Record<string, AsyncApiSchema> {
const schemas: Record<string, AsyncApiSchema> = {};
schemas.StrategyResponse = {
type: 'object',
properties: {
success: {
type: 'boolean',
description: '성공 여부',
},
data: {
type: 'object',
description: '응답 데이터',
},
error: {
type: 'string',
description: '에러 메시지',
},
code: {
type: 'string',
description: '에러 코드',
},
},
required: ['success'],
};
actions.forEach((action) => {
const requestSchemaId = this.getRequestSchemaId(action);
const requestSchema = this.dtoToJsonSchema(
action.requestDto,
action,
);
schemas[requestSchemaId] = requestSchema;
if (action.responseDto) {
const responseSchemaId = this.getResponseSchemaId(action);
schemas[responseSchemaId] = this.dtoToJsonSchema(
action.responseDto,
);
}
});
return schemas;
}
Socket 액션의 DTO를 JSON Schema로 변환해 AsyncAPI 스펙의 components.schemas 영역을 자동 생성합니다.
명시한 request, response DTO를 스키마 형태에 맞게 변경하는 역할을 수행하게 됩니다.
처리 흐름

- 공통 응답 스키마 StrategyResponse를 추가한다.
- actions를 돌면서
- 요청 DTO는 dtoToJsonSchema로 스키마를 만든다.
- 응답 DTO가 있으면 역시 dtoToJsonSchema로 스키마를 만든다.
- 이렇게 얻은 스키마들을 components.schemas에 등록한다.
dtoToJsonSchema
private dtoToJsonSchema(dto: Type<any>, action?: SocketDocsMetadata): any {
try {
const metadata = getMetadataStorage();
const targetMetadata = metadata.getTargetValidationMetadatas(
dto,
'',
false,
false,
);
const properties: Record<string, any> = {};
const required: string[] = [];
targetMetadata.forEach((meta) => {
const propertyName = meta.propertyName;
if (!properties[propertyName]) {
	properties[propertyName] = {
		type: this.inferType(meta.type),
		description: meta.message || '',
	};
}
if (
	meta.type === 'isNotEmpty' ||
	meta.type === 'isDefined' ||
	meta.type === 'isNotEmptyObject'
) {
	if (!required.includes(propertyName)) {
		required.push(propertyName);
	}
}
this.applyConstraints(properties[propertyName], meta);
});
if (action && action.message === 'edit') {
return {
type: 'object',
properties: {
message: {
type: 'string',
const: 'edit',
description: '메시지 타입',
},
block: {
type: 'string',
const: action.block,
description: '블록 타입',
},
action: {
type: 'string',
const: action.action,
description: '액션 타입',
},
submissionId: {
type: 'string',
description: 'Submission ID',
},
data: {
type: 'object',
properties,
required,
description: '액션별 데이터',
},
},
required: [
'message',
'block',
'action',
'submissionId',
'data',
],
example: action.examples?.request,
};
}
return {
type: 'object',
properties,
required,
example: action?.examples?.request,
};
} catch (error) {
this.logger.warn(
`Failed to generate schema for ${dto.name}: ${error instanceof Error ? error.message : 'Unknown error'}`,
);
return {
type: 'object',
description: `Schema for ${dto.name}`,
};
}
}
dto 클래스를 AsyncAPI 스키마로 변경시켜주는 메서드입니다.
우선 전달받은 dto 클래스의 메타데이터를 모두 가져오게 됩니다.
getTargetValidationMetadatas를 통해 class-validator의 메타데이터를 모두 가져올 수 있습니다. 이는 dto에 명시된 제약 조건(타입 체크)들을 가져와서 스키마 형태로 알맞게 변경하기 위함입니다.
이제 가져온 메타데이터를 돌면서, properties 객체(스키마 객체)를 완성시킵니다. 아래와 같은 흐름으로 진행됩니다.
프로퍼티 정의 및 필수 필드 추출
첫째, inferType를 통한 타입 매핑(meta.type)
if (!properties[propertyName]) {
properties[propertyName] = {
type: this.inferType(meta.type),
description: meta.message || '',
};
}
아래와 같이 메타데이터의 type을 바탕으로 타입을 예측하고, 스펙에 맞게 변경해줍니다.
private inferType(validatorType: string): string {
const typeMap: Record<string, string> = {
isString: 'string',
isNumber: 'number',
isInt: 'integer',
isBoolean: 'boolean',
isArray: 'array',
isObject: 'object',
isDate: 'string',
isEmail: 'string',
isUrl: 'string',
isUUID: 'string',
};
return typeMap[validatorType] || 'string';
}
예를 들어 @IsString() 데코레이터가 붙어 있으면 meta.type은 isString으로 표시됩니다. 이때 AsyncAPI 스펙에서는 string으로 표현해야 하므로 매핑을 통해 타입을 변환해 줍니다.
| class-validator | JSON Schema |
|---|---|
@IsString() | string |
@IsNumber() | number |
@IsInt() | integer |
@IsBoolean() | boolean |
@IsArray() | array |
@IsObject() | object |
@IsDate() | string(format: date-time) |
@IsEmail() | string(format: email) |
@IsUrl() | string(format: uri) |
@IsUUID() | string(format: uuid) |
둘째, 필수 여부 데코레이터 체크
if (
meta.type === 'isNotEmpty' ||
meta.type === 'isDefined' ||
meta.type === 'isNotEmptyObject'
) {
if (!required.includes(propertyName)) {
required.push(propertyName);
}
}
isNotEmpty,isDefined,isNotEmptyObject
필수 여부에 대한 메타데이터를 넣어주고, 스펙에 맞게 변경해줍니다. 해당 데코레이터 제약들은 따로 required 배열에 저장하게 됩니다.
{
	type: 'object',
	properties: {
	 ...
	},
	required: [
		'message',
		'block',
		'action',
		'submissionId',
		'data',
	],
	example: action.examples?.request,
};
이유는 위와 같이 AsyncAPI의 스키마 스펙 상 required인 필드를 명시할 때, 따로 required 배열을 받기 때문입니다.
셋째, 제약조건 적용
this.applyConstraints(properties[propertyName], meta);

private applyConstraints(property: any, meta: any): void {
	switch (meta.type) {
		case 'isEmail':
			property.format = 'email';
			break;
		case 'isUrl':
			property.format = 'uri';
			break;
		case 'isUUID':
			property.format = 'uuid';
			break;
		case 'isDate':
			property.format = 'date-time';
			break;
		case 'min':
			property.minimum = meta.constraints[0];
			break;
		case 'max':
			property.maximum = meta.constraints[0];
			break;
		case 'minLength':
			property.minLength = meta.constraints[0];
			break;
		case 'maxLength':
			property.maxLength = meta.constraints[0];
			break;
	}
}
아래와 같이 메타데이터의 조건을 바탕으로 조건을 예측하고, 스펙에 맞게 변경해주고 있습니다. 위에서 확인한 [타입] [필수]에 대한 제약조건 외의 모든 케이스에 대해서 대응하는 단계입니다.
@Min(n)=minimum: n@Max(n)=maximum: n@MinLength(n)=minLength: n@MaxLength(n)=maxLength: n
하지만 현실적으로 class-validator에는 너무나도 많은 제약조건이 있습니다. 이를 모두 대응하는 것은 어렵기 때문에 필수적으로 사용하는 부분만 추가되었습니다.
앞으로 범용성 있게 사용이 되려면 모든 제약조건에 대해서 대응이 되어야합니다. (하드코딩 하기 보다는 패키지에서 가져오는 방법이 없을지 고민해보겠습니다.)
edit 액션에 대한 wrapper 추가
if (action && action.message === "edit") {
  return {
    type: "object",
    properties: {
      message: {
        type: "string",
        const: "edit",
        description: "메시지 타입",
      },
      block: {
        type: "string",
        const: action.block,
        description: "블록 타입",
      },
      action: {
        type: "string",
        const: action.action,
        description: "액션 타입",
      },
      submissionId: {
        type: "string",
        description: "Submission ID",
      },
      data: {
        type: "object",
        properties,
        required,
        description: "액션별 데이터",
      },
    },
    required: ["message", "block", "action", "submissionId", "data"],
    example: action.examples?.request,
  };
}

return {
  type: "object",
  properties,
  required,
  example: action?.examples?.request,
};
폼빌더에서 edit 액션에 대한 프로퍼티는 사실 정해져 있습니다.
// edit 액션 예시
properties: {
	message: const 'edit', // wrapper
	block: const action.block, // wrapper
	action: const action.action, // wrapper
	submissionId: string, // wrapper
	data: DTO 변환 결과 // 정의한 DTO
}
- message, block, action, submissionId가 있고, 그 다음에 해당 메서드를 통해서 DTO를 통해 뽑아온 스펙이 data라는 필드 아래로 가야합니다. (BaseRequest 래핑)
반면 일반 요청의 경우는 properties 자체가 DTO 객체가 되어야하기 때문에 그대로 반환하게 됩니다.
// 일반 요청 예시
properties: DTO 변환 결과 // 정의한 DTO
예시
export class UpdateActionValueDto extends PickType(ActionValue, [
	'conditionalLogicId',
]) {
	@IsOptional()
	@IsArray()
	valueList: string[] | null;
}
위와 같은 DTO 클래스가 있다고 가정하겠습니다.
메타데이터
[
      // conditionalLogicId (ActionValue에서 상속된 필드의 validator)
      { propertyName: 'conditionalLogicId', type: 'isString', ... },
      { propertyName: 'conditionalLogicId', type: 'isNotEmpty', ... },

      // valueList
      { propertyName: 'valueList', type: 'isOptional', ... },
      { propertyName: 'valueList', type: 'isArray', ... },
  ]
해당 클래스에서 뽑아낼 수 있는 class-validatior의 메타데이터 리스트는 위와 같습니다.
프로퍼티 및 필수 필드 추출
  const properties = {};
  const required = [];

  // conditionalLogicId 처리
  // meta.type = 'isString'
  properties['conditionalLogicId'] = {
  // meta.type = 'isNotEmpty'
  required.push('conditionalLogicId');  // 필수 필드로 추가

  // valueList 처리
  // meta.type = 'isArray' (첫 번째 메타데이터)
  properties['valueList'] = {
conditionalLogicId 필드
- 타입 제약조건으로는 @IsString이 string으로 변경되어서 properties key-value가 완성됩니다.
- 필수 제약조건으로는 @isNotEmpty가 required 배열로 추가됩니다.
valueList 필드
- 타입 제약조건으로는 @IsArray가 array으로 변경되어서 properties key-value가 완성됩니다.
결과
properties = {
	conditionalLogicId: {
	    type: 'string',
        description: ''
    },
    valueList: {
        type: 'array',
        description: ''
    }
}

required = ['conditionalLogicId']
위와 같은 결과로 properties, required 배열이 생성된다.
최종 출력
{
    "actionValue_update_request": {
      "type": "object",
      "properties": {
        "message": {
          "type": "string",
          "const": "edit",
          "description": "메시지 타입"
        },
        "block": {
          "type": "string",
          "const": "actionValue",
          "description": "블록 타입"
        },
        "action": {
          "type": "string",
          "const": "update",
          "description": "액션 타입"
        },
        "submissionId": {
          "type": "string",
          "description": "Submission ID"
        },
        "data": {
          "type": "object",
          "description": "액션별 데이터",
          "properties": {
            "conditionalLogicId": {
              "type": "string",
              "description": ""
            },
            "valueList": {
              "type": "array",
              "description": ""
            }
          },
          "required": ["conditionalLogicId"]
        }
      },
      "required": [
        "message",
        "block",
        "action",
        "submissionId",
        "data"
      ]
    }
  }
최종 결과값이고, 이를 통해서 아래와 같은 스키마 스펙이 만들어지는 것을 확인할 수 있다.
마무리하며
이러한 과정들을 거쳐서 소켓에 대한 AsyncAPI 문서가 생성됩니다.
마무리하기 전에 흐름을 쉽게 정리하고 마무리하려고 합니다.
AsyncAPI의 컴포넌트
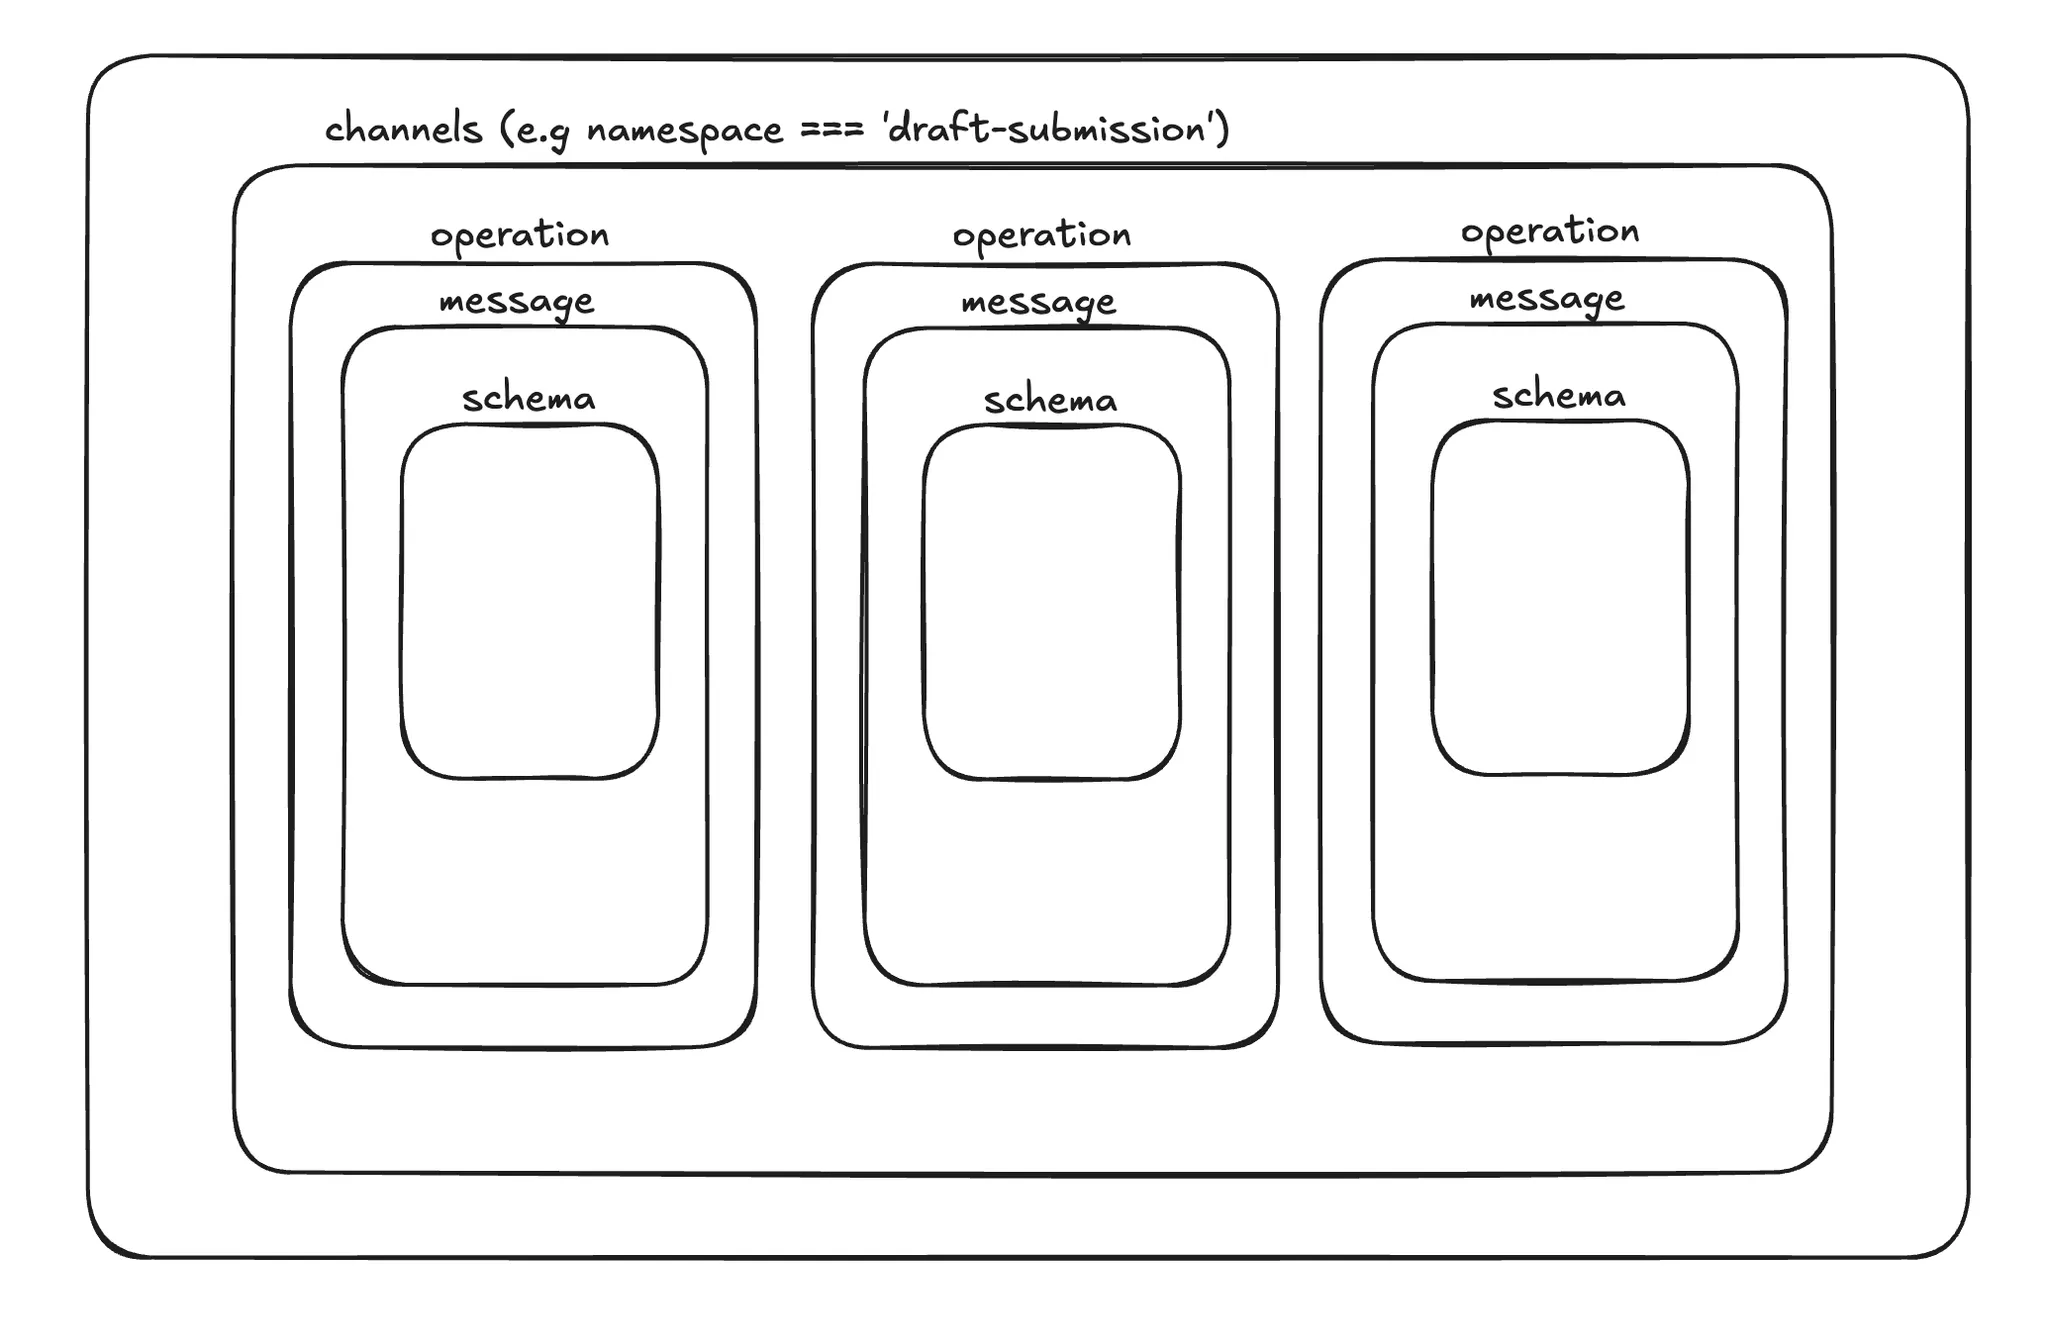
현재 서비스에서 사용하고 있는 구조는 위와 같다.
- 결론적으로 하나의(action + block)이
operation이 되고, 그에 따라서message가 1개가 매핑이 된다. 당연하게DTO는 한개씩 배정되어schema로 존재하게 된다.
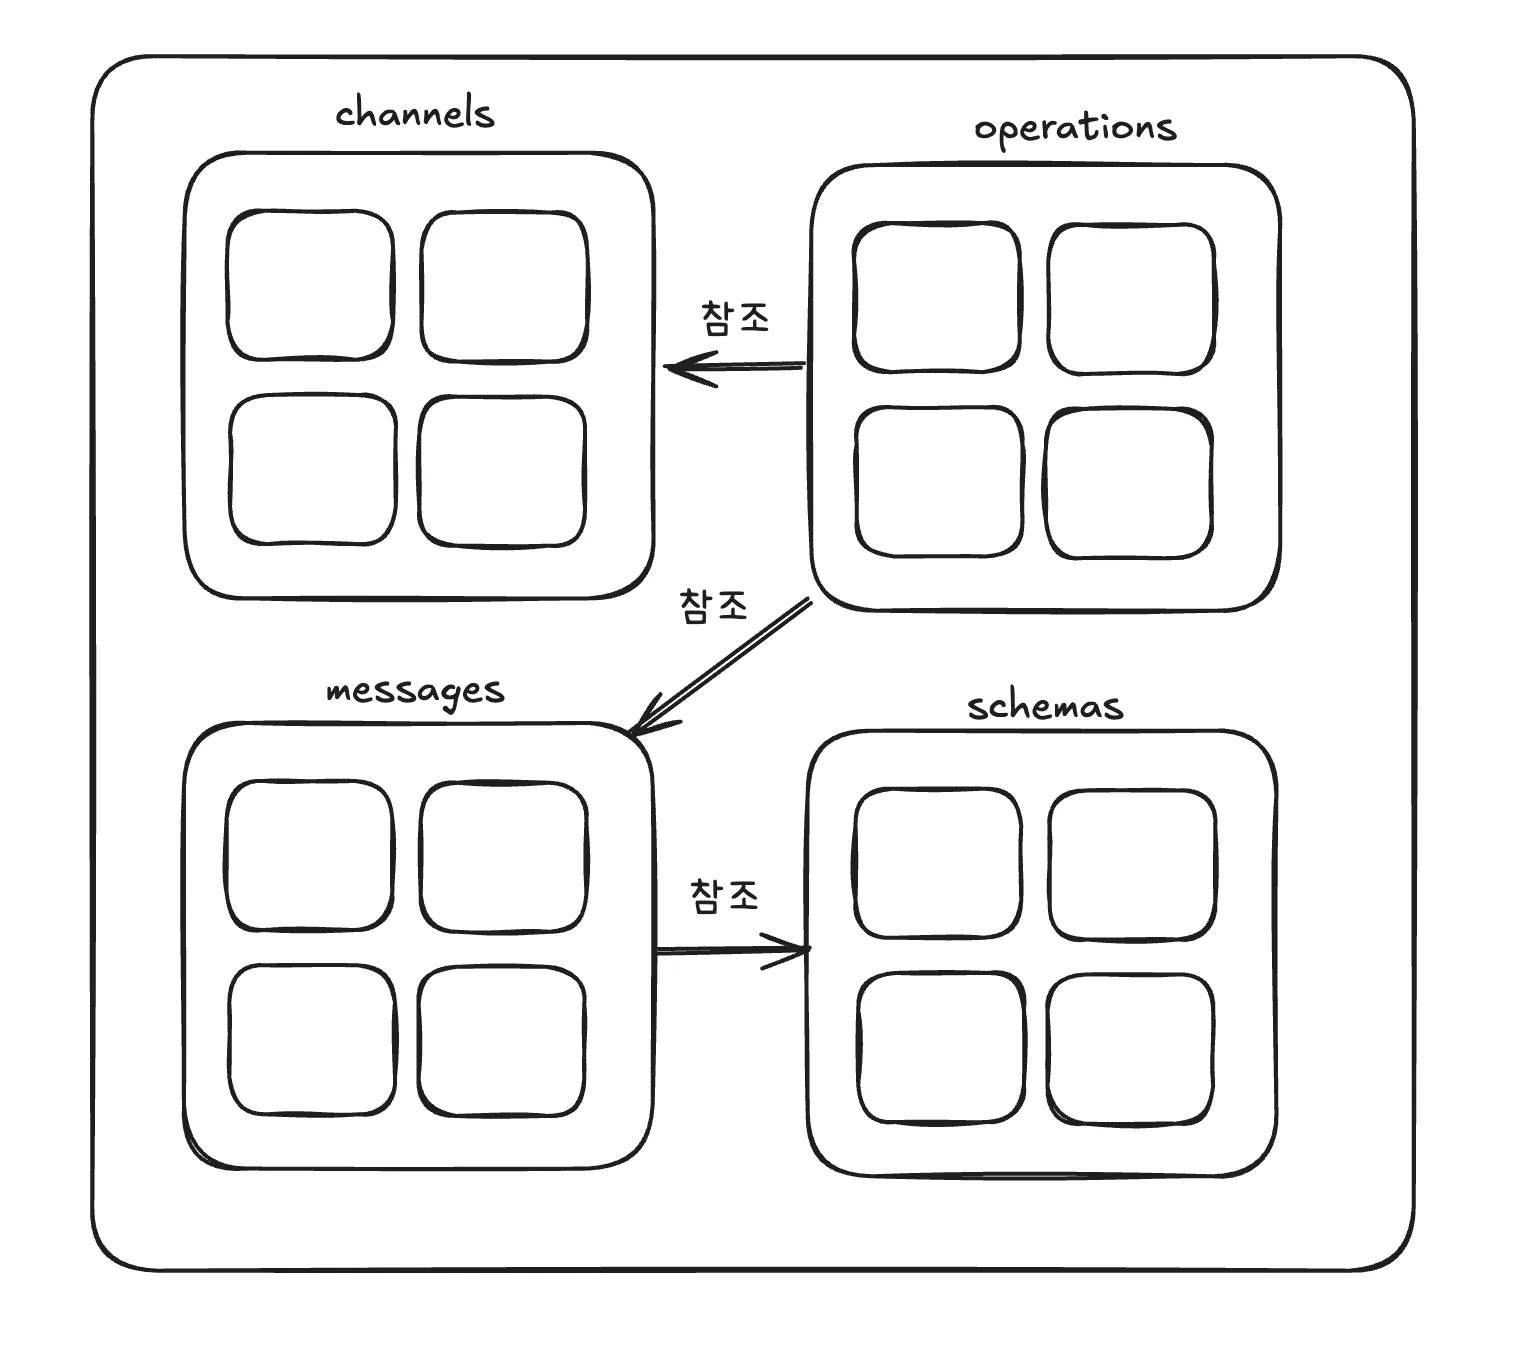
다만 위에 있는 구조도는 이해를 돕기 위한 추상적인 구조도일 뿐이다.
AsyncAPI에서는 각 컴포넌트들을 배열로 관리하고 있고, 각각 필요할때 해당 요소들을 참조해서 뽑아 쓴다.
스프링 빈이나 nest에서 사용하는 Injectable과 유사한 방식이라고 보면 이해하기 쉽다.
데코레이터 기반 메타데이터 수집 흐름
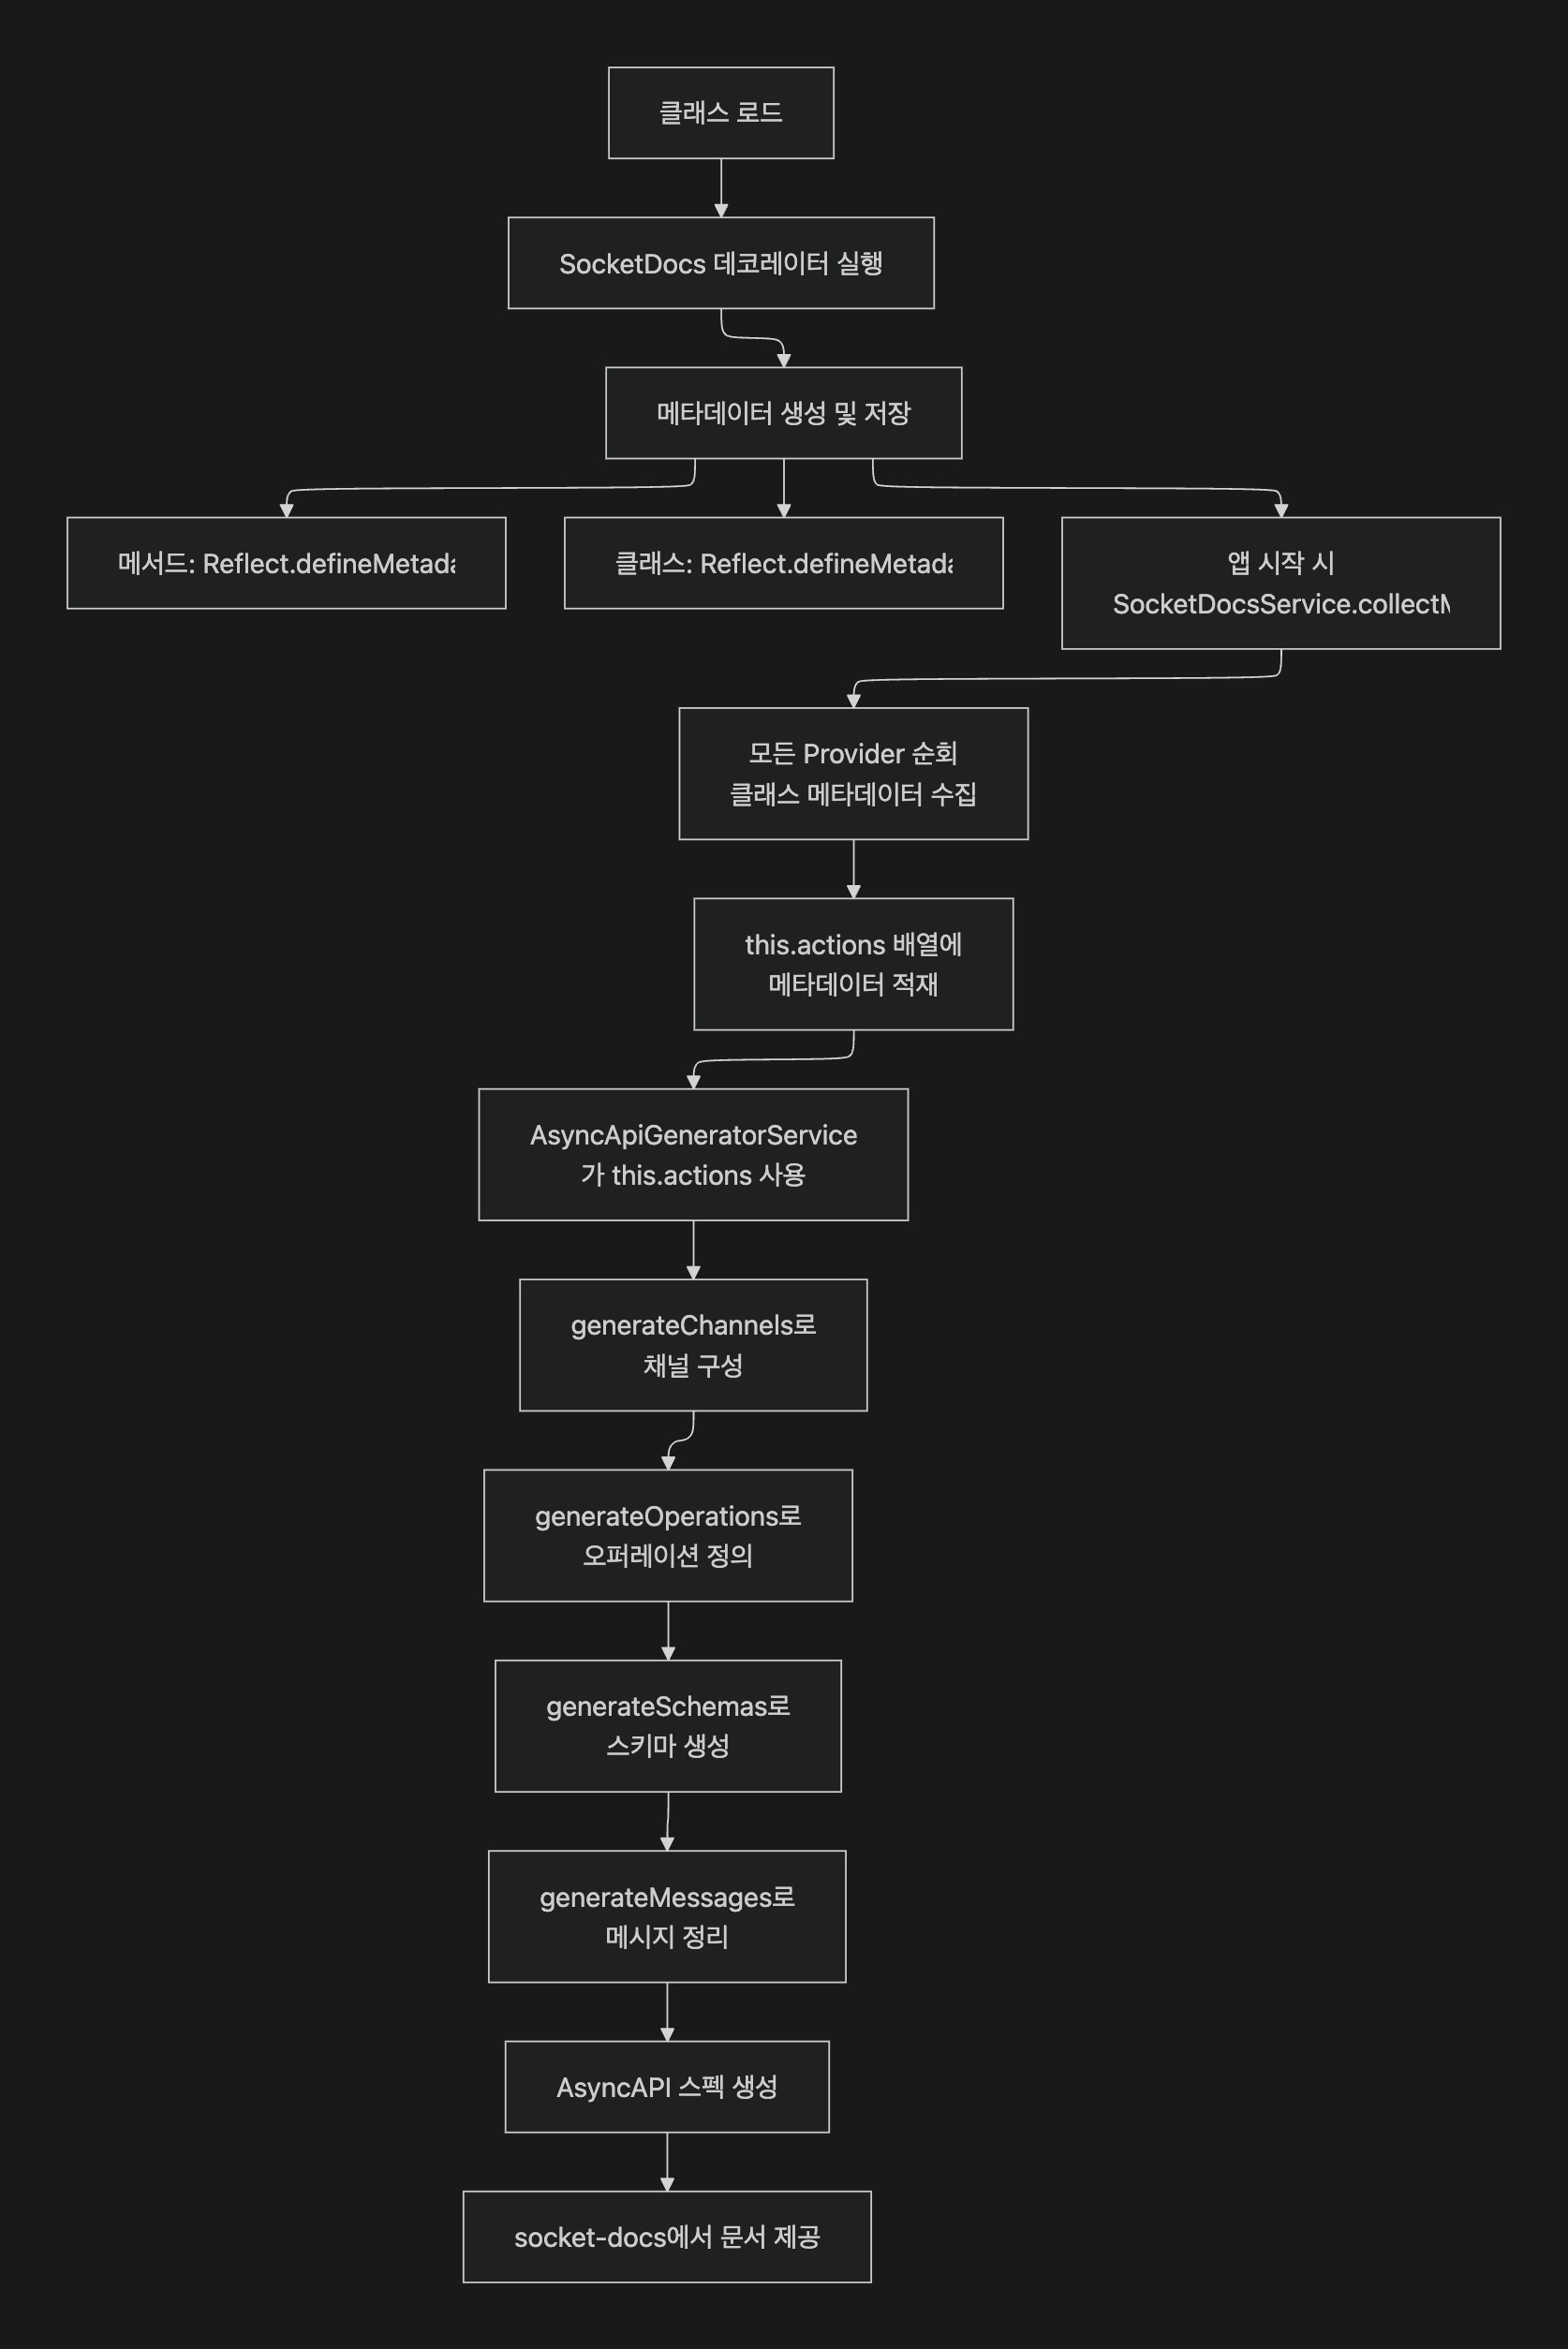
- 클래스가 로드되면
SocketDocs데코레이터가 실행되고, 메서드/클래스 단에 메타데이터를 저장합니다. - 애플리케이션이 올라갈 때
SocketDocsService.collectMetadata가 모든 프로바이더를 훑어서 메타데이터를this.actions에 모읍니다. AsyncApiGeneratorService가 이 actions를 받습니다.
최종 AsyncAPI 문서는 /socket-docs에서 제공되어, 웹 문서가 해당 스펙을 기반으로 렌더링합니다.
마치며
노션에 손수 정리하던 소켓 명세를 AsyncAPI 기반의 자동화된 문서화 시스템으로 전환하면서, 협업 효율이 크게 개선되었습니다.
기존 nestjs-asyncapi 라이브러리는 저희 서비스의 메시지 Body 기반 라우팅 패턴과 맞지 않았기에, 직접 커스텀 솔루션을 만들었습니다. 데코레이터 기반으로 메타데이터를 수집하고, class-validator의 제약조건을 AsyncAPI 스키마로 자동 변환하는 방식으로 구현했습니다.
결과적으로 개발자는 서비스 메서드에 SocketDocs 데코레이터만 추가하면, block + action 조합별로 상세한 API 문서가 자동으로 생성됩니다. 이제 프론트엔드 팀은 실시간으로 업데이트되는 문서를 통해 정확한 요청/응답 스펙을 확인할 수 있게 되었습니다.
물론 아직 개선할 부분도 많습니다. class-validator의 모든 제약조건을 지원하지 못하고 있고, 응답 스키마 자동 생성 기능도 추가할 계획입니다. 하지만 서비스에 맞춘 가볍고 실용적인 접근으로 시작했기에, 점진적으로 확장해 나갈 수 있을 것입니다.
REST API 영역에서 OpenAPI가 그랬듯이, 이제 저희 WebSocket API도 AsyncAPI를 통해 체계적으로 문서화되어 더 나은 협업 환경을 만들어가고 있습니다.